Proxmox: Cloud Init VM Setup With Ansible-Playbooks
Overview
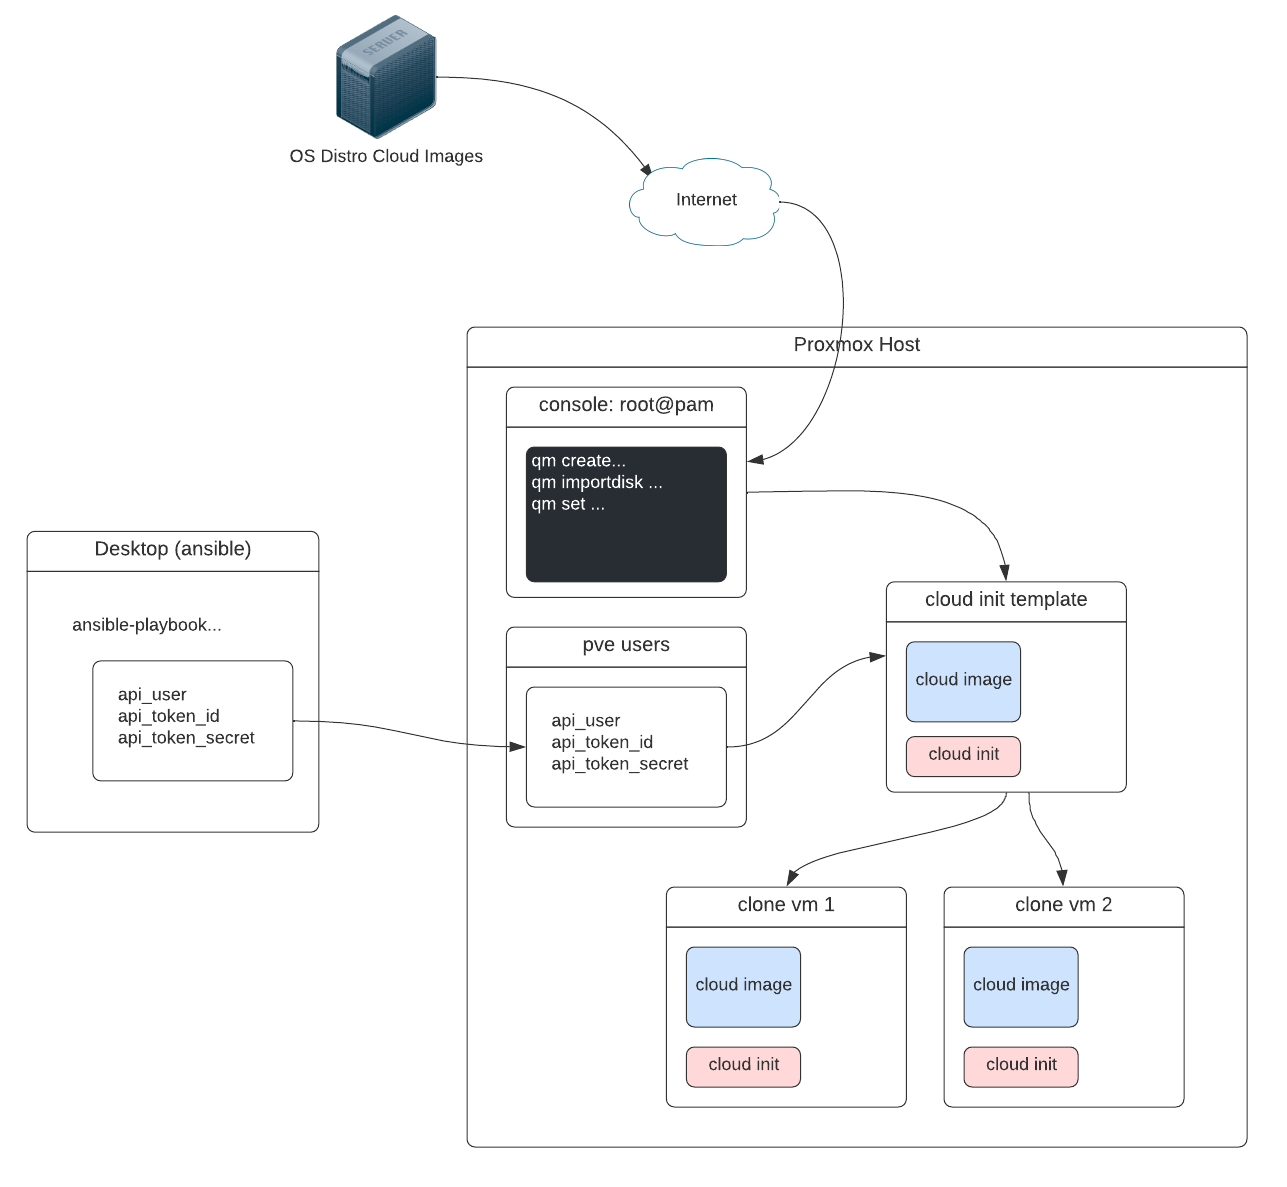
Basically what we're trying to setup is a Proxmox Host that can run Ansible playbooks against to create cloud-init enabled virtual machines from a pre-made template we source from official cloud sources.
Systems / Architecture Diagram
What you can see here is the following:
- Ansible desktop client running
ansible-playbookwith proxmox user api token credentials - a console session as
root@pamuser which sources an official cloud image and create a cloud-init enabled template from it - the playbook successfully creates
clone vm 1andclone vm 2from the template.
Proxmox Host Setup
Install the following for the Proxmox host to handle requests from the ansible modules proxmox and proxmox_kvm
apt install -y python-pip3 python3-dev build-essential libguestfs-tools
pip3 install virtualenv
pip3 install proxmoxer requests
tbh I don't know if proxmoxer or requests actually do anything with my setup, so ymmv.
User API Token
I've opted to use API tokens instead of my users account credentials for security reasons where you can set an expiry date and also limit permissions on the tokens. Just easier to manage and keep separate from your user.
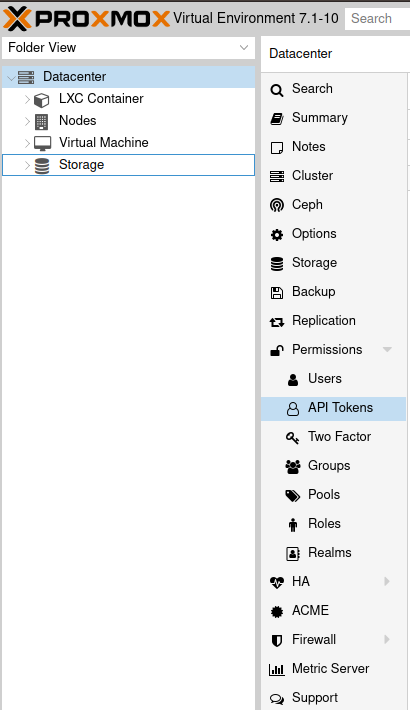
On your proxmox host, go to Datacenter-> API Tokens:
and create a token under your chosen user:
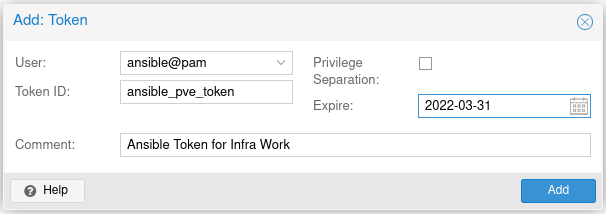
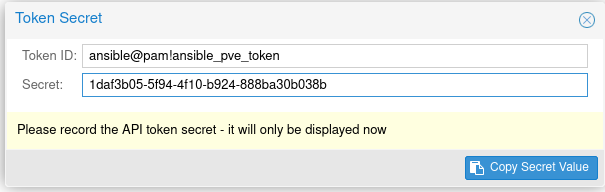
here are your token id and secret, make a note as you'll need them later on in our ansible playbooks:
note the format of the tokenid ansible@pam!ansible_pve_token:
- user =
ansible@pam - id =
ansible_pve_token
Cloud image + Customizations
You will download and customize a cloud image on the proxmox host, that's the easiest most straight-forward way until this step gets automated.
As per ianddays blog, you need to have the following files available:
/root/keys/id_mykeys.pubwith the public key you allow to ssh to this image/root/ansibleis just a file with the ansible users sudo permissions i.e. just a file with this text:ansible ALL=(ALL) NOPASSWD: ALL
Important note on the machine-id inside the cloud image: the file /etc/machine-id has an ID in it, if you don't delete it and leave the file blank before you convert the image to template, the clones you create from the template will all have the same machine-id and be assigned the same network details.
I added in the >/etc/machine-id command making the machine-id file blank.
Run these commands on your Proxmox Host:
# download cloud-init enabled cloud image -- Ubuntu
wget https://cloud-images.ubuntu.com/impish/current/impish-server-cloudimg-amd64.img
We use virt-customize to modify the disk image in place and add our customizations without needing the image to be running.
Does not have to be run as root, preferrably not according to the authors of the tool.
# customize the image using `virt-customize` provided by libguestfs-tools package.
virt-customize -a impish-server-cloudimg-amd64.img --update
virt-customize -a impish-server-cloudimg-amd64.img --install qemu-guest-agent
virt-customize -a impish-server-cloudimg-amd64.img --run-command 'useradd --shell /bin/bash ansible'
virt-customize -a impish-server-cloudimg-amd64.img --run-command 'mkdir -p /home/ansible/.ssh'
virt-customize -a impish-server-cloudimg-amd64.img --ssh-inject ansible:file:/root/keys/id_mykeys.pub
virt-customize -a impish-server-cloudimg-amd64.img --run-command 'chown -R ansible:ansible /home/ansible'
virt-customize -a impish-server-cloudimg-amd64.img --upload /root/ansible:/etc/sudoers.d/ansible
virt-customize -a impish-server-cloudimg-amd64.img --run-command 'chmod 0440 /etc/sudoers.d/ansible'
virt-customize -a impish-server-cloudimg-amd64.img --run-command 'chown root:root /etc/sudoers.d/ansible'
virt-customize -a impish-server-cloudimg-amd64.img --run-command '>/etc/machine-id' # important step so your clones get unique mac address / network details.
Now we create a VM in proxmox and use our customized, cloud-init enabled image as the disk image for the VM:
#create vm + customize
qm create 9000 --name "ubuntu-impish-cloudinit-template" --memory 2048 --cores 2 --net0 virtio,bridge=vmbr0
qm importdisk 9000 impish-server-cloudimg-amd64.img ZFS01
qm set 9000 --scsihw virtio-scsi-pci --scsi0 ZFS01:vm-9000-disk-0
qm set 9000 --boot c --bootdisk scsi0
qm set 9000 --ide2 ZFS01:cloudinit
qm set 9000 --serial0 socket --vga serial0
qm set 9000 --agent enabled=1
Finally, convert to template:
# convert vm to template
qm template 9000
You should now have a template in your GUI that looks like this:
![]()
Create VMs from cloud-init template
Ansible Playbooks
I have ansible installed on my desktop and will run the playbooks on my local machine which will call my Proxmox Host/Server, and the proxmoxer module will execute the request and create our vms.
First, simple hosts file setup, in a folder called playbook/, a file named hosts:
[proxmox]
your.proxmox.host ansible_user=root
And then, a very simple playbook, let's call it playbook/create-cloud-vm.yml
---
# create-cloud-vm.yml

- name: 'Deploy our Cloud-init VMs'

  hosts: proxmox

  tasks:
  - name: Clone cloud-init template
    community.general.proxmox_kvm:
      node: proxmox
      vmid: 9000
      clone: gemini
      name: cloud-1
      api_user: ansible@pam
      api_token_id: ansible_pve_token
      api_token_secret: 1daf3b05-5f94-4f10-b924-888ba30b038b
      api_host: your.proxmox.host
      storage: ZFS01
      timeout: 90

  - name: Start VM
    community.general.proxmox_kvm:
      node: proxmox
      name: cloud-1
      api_user: ansible@pam
      api_token_id: ansible_pve_token
      api_token_secret: 1daf3b05-5f94-4f10-b924-888ba30b038b
      api_host: your.proxmox.host
      state: started
Obviously!!
DON'T hard code your creds like this and DO look into an ansible-vault setup for fetching/injecting creds at runtime so you don't have them lying around or accidentally commit to source. Version 2 of this write-up will have a security section at a later date. These are just general notes for now.
Run Playbooks
Right, there's nothing left to it but to do it, from your local desktop ansible setup, run: ansible-playbook -i hosts playbooks/create-cloud-vm.yml
Verify
If everything was setup correctly and more importantly, that cloud init actually did its magic, you will see
- each cloned VM has a hostname of the vm name you specified in the playbook e.g.
cloud-1 - each cloned VM has a unique IP address and a unique
/etc/machine-idnumber.
Troubleshooting
Just some random troubleshooting notes:
Check the Proxmox API
Checking Proxmox API is working: curl -k -d "username=root@pam&password=yourpassword" https://10.0.0.1:8006/api2/json/access/ticket
Proxmox: VM wont stop
- console into the proxmox server
- try
qemu stop <VMID> - if it says "can't lock file '/var/lock/..." do
rm -f /var/lock/....whatever that file is - do
qm stop <VIMID>again.
One other place to look for the lock file is /run/lock/qemu-server/*
References
Credit for various parts of the process goes to these folks, some of the docs were not easy to follow, but credit where due:
- cloud-init image for proxmox. Useful Rating: 10/10
- proxmox wiki. Useful Rating: 9/10
- blog.dmcindoe.dev. Useful Rating: 8/10
- vectops blogs. Useful Rating: 7/10
- ansible documentation Usefule Rating: 9/10