AWS S3 Static Blog
Published Date: 29-JUL-2018
When I decided to create https://cloudbuilder.io (I've had a few over the years) I figured I would do it in "the cloud", and use some CI/CD concepts along the way.
While there are lots of options for a quick & easy website setup (think Squarespaces, Wix.com, WordPress), I wanted a blog that was a bit "hands on", and which gave me plenty of control over the look, feel and access to the whole site.
My previous blog was a static site hosted on Github Pages which is where I first discovered a) what a static site was and b) Jekyll.
So I thought - "more of that, but add in some other functions to make it interesting."
Overview
My site consists of the following:
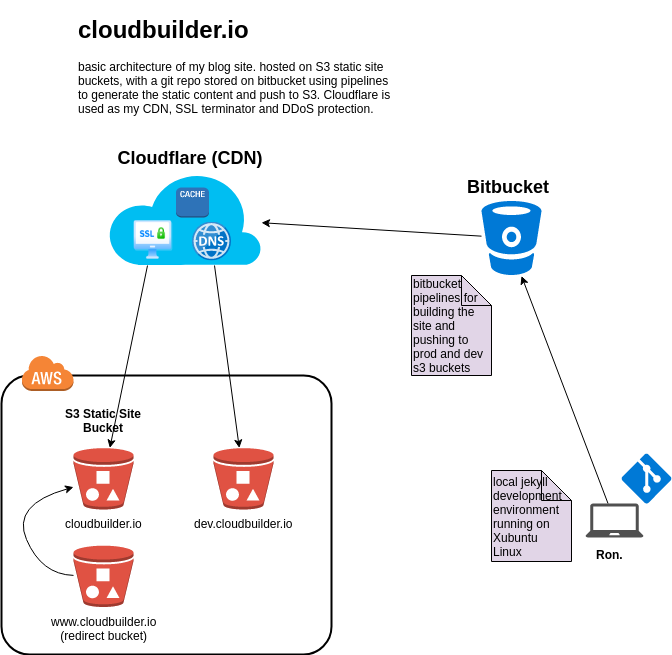
- AWS S3 buckets
- 1 x PROD, 1 x DEV, (1 x redirect bucket)
- CDN Cloudflare
- provides SSL
- cache
- Bitbucket repo
- pipelines for tests & deployment
- Jekyll site
- generates static site content
AWS S3 Buckets
Let's look at my S3 bucket setup.
I came across the ability of AWS to host a static site when studying for my AWS Solution Architect Associate Cert. This worked out well for me because I was using Github pages to host a static content site at the time.
You can walk through a detailed setup via AWS documentation, but I'll give a quick overview of the S3 setup
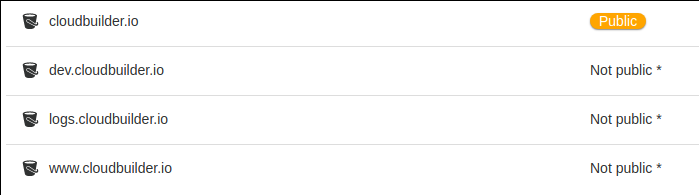
here we have:
- 1 x Public S3 Bucket (cloudbuilder.io) - where all the static content being served will live
- 1 x Private S3 Bucket (www.cloudbuilder.io) - used to capture and redirect requests to 'www' back to https://cloudbuilder.io.
- 1 x Private Dev Bucket for "development" (more like 'staging' for reasons I'll note later)
Public Bucket
setting an S3 bucket up to host static content is as simple as going into said bucket, and enabling the 'static website hosting' function:
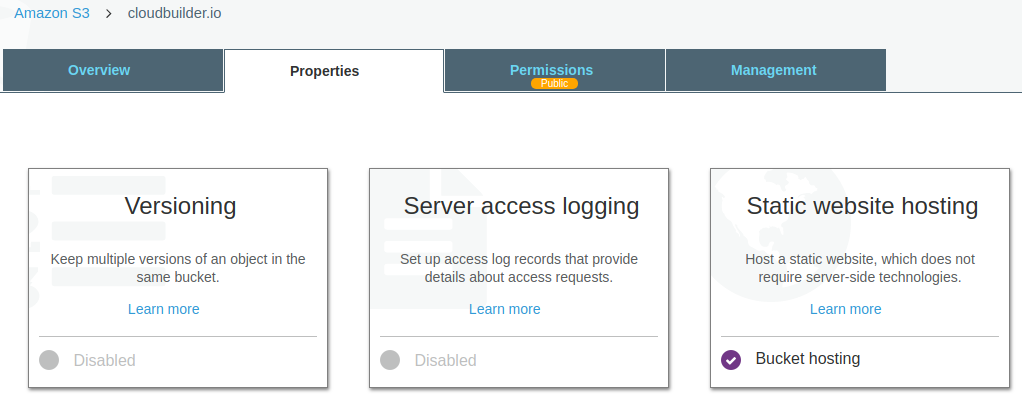
then set your index.html and 404.html files
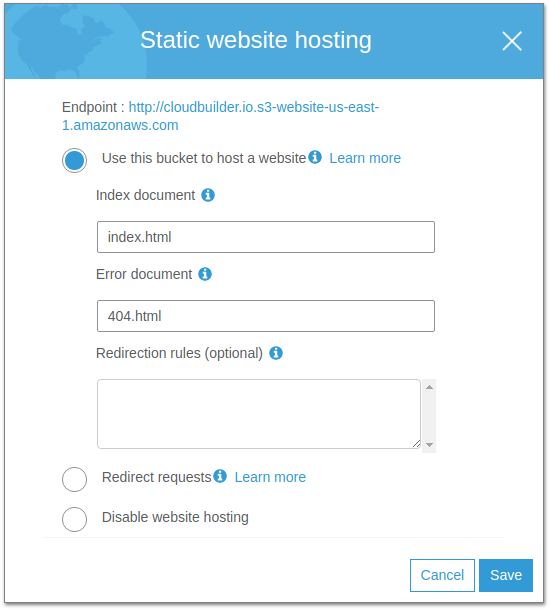
Redirect Bucket
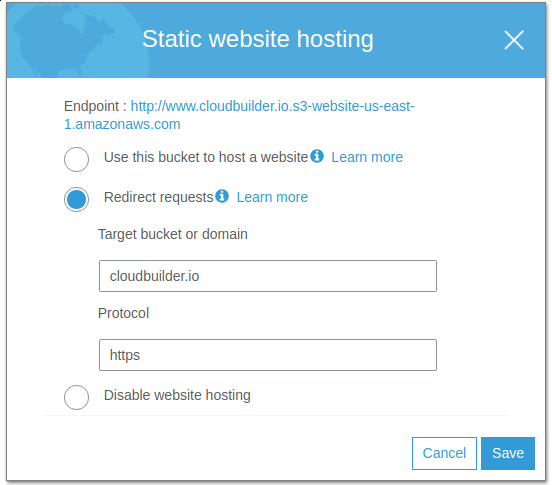
For the redirect bucket, it's the same as the public bucket - you enable the static website hosting
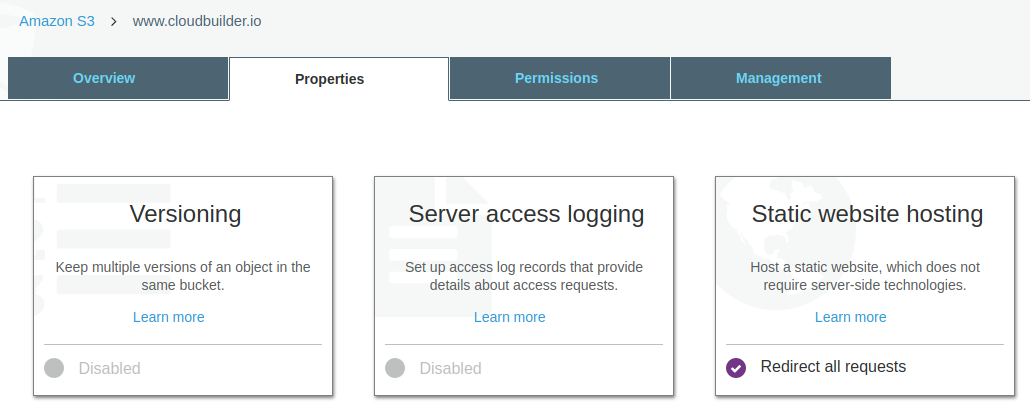
only you're choosing 'Redirect requests' option for this bucket and setting the 'target bucket' pointing to the public bucket (cloudbuilder.io) and to use https
Development Bucket
This bucket is pretty much like the PROD bucket only its private. I used this bucket to push from my 'develop' branch to Bitbucket, which would use the development pipeline to build and push changes to this bucket for me to "preview". The way to access the bucket while 'private' was setting a 'Bucket Policy' to allow my home IP address in:
- Go to your s3 bucket
- 'Permissions'
- 'Bucket Policy'
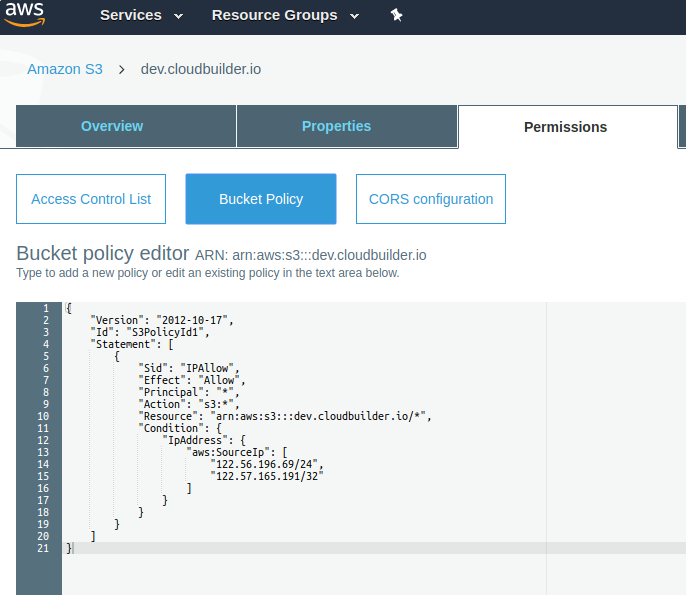
Paste this policy in but change the "aws:SourceIp" to your IP or subnet that includes IPs you want to allow:
{
    "Version": "2012-10-17",
    "Id": "S3PolicyId1",
    "Statement": [
        {
            "Sid": "IPAllow",
            "Effect": "Allow",
            "Principal": "*",
            "Action": "s3:*",
            "Resource": "arn:aws:s3:::dev.cloudbuilder.io/*",
            "Condition": {
                "IpAddress": {
                    "aws:SourceIp": [
                        "122.56.196.69/24",
                        "122.57.165.191/32"
                    ]
                }
            }
        }
    ]
}
Content Distribution Network (CDN)
I decided to use Cloudflare because
a) I needed TLS/SSL for my site in a fairly easy/hands-off manner and
b) they're free (for one domain).
Cloudflare comes with a range of useful functions and capabilities:
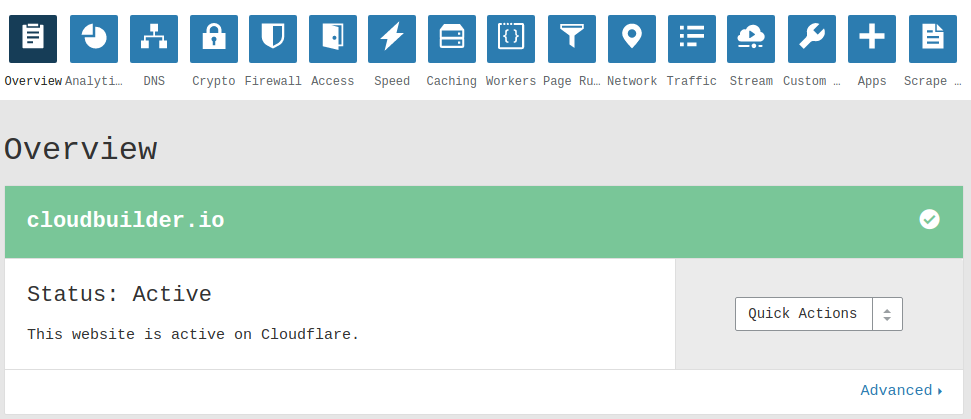
For cloudbuilder.io cloudflare takes care of:
- TLS/SSL Server Certificate
- DNS
- Caching
- DDoS Protection
Note about CDNs: A CDN is usually a good idea for a website because it takes the pressure off the origin server by caching objects and serving them at the CDN layer, which depending on where the request is coming from relative to the CDN, improves response times because it's closer to the user than the origin server.
Git Repo (Bitbucket)
Now originally my website repo was over at Github, but I needed my site to be in a 'private' repo. Github you had to pay, but Bitbucket has free private repos so I moved my site there.
Nothing out of the ordinary here
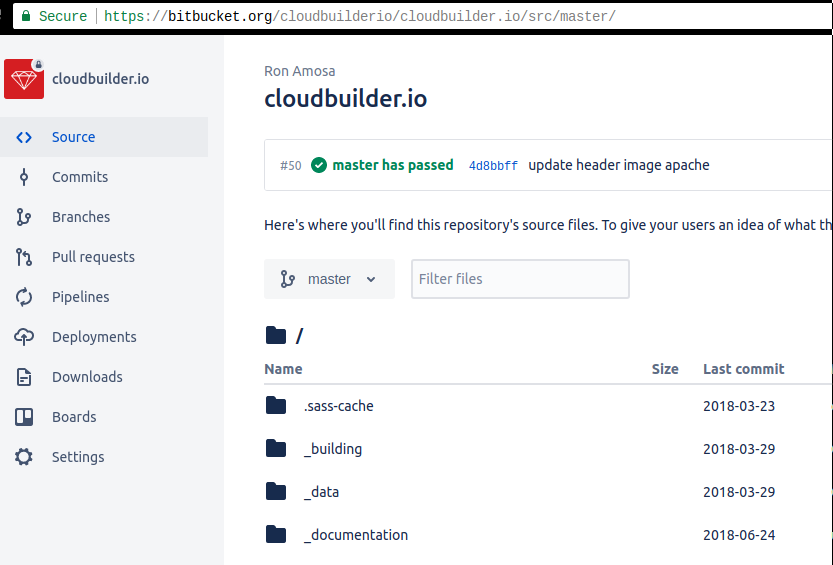
I have a 'master' branch which is what's deployed to the live cloudbuilder.io site. And a 'develop' branch which, as you would assume, handles all my new changes and latest draft posts I'm working on.
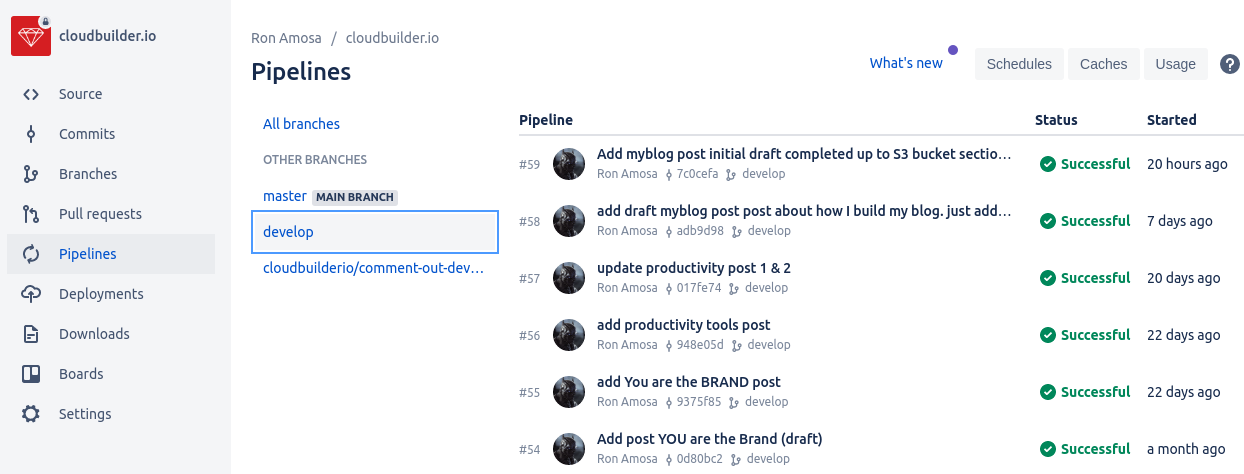
Pipelines
Probably the most interesting thing about my bitbucket repo is the pipelines that 'build' my static site (i.e. generate the static content via Jekyll). Every time I 'git push' to my develop branch the 'develop pipeline' kicks off and builds the static content, and pushes it to the AWS S3 dev.cloudbuilder.io bucket.
this is pretty cool, you just include a bitbucket-pipelines.yml file in the root directory of your repo and bitbucket will pick it up and run it under the 'Pipelines' section.
Essentially the pipeline uses an image to create a container where I create a little Jekyll environment that sucks in my website code and pumps out the static content, which is then "pushed" to my AWS S3 buckets.
This is my bitbucket-pipelines.yml file, few things to note
image: ruby:2.4.0

pipelines:

  default:
    - step:
        script:
          - echo "There is no default step. Try something else.."

  branches:
    master:
      - step:
          script:
            - echo "<<MASTER />> build is running..."
            - bundler --version
            - bundle install
            - JEKYLL_ENV=production jekyll build
            - gem install s3_website
            - apt-get update
            - apt-get install --assume-yes openjdk-7-jre-headless
            - sed -i s/BUCKET_NAME/$PROD_BUCKET/g s3_website.yml
            - s3_website push

    develop:
      - step:
          name: Build DEV
          caches:
            - bundler
          script:
            - echo "[[DEVELOP]] build is running..."
            - bundler --version
            - bundle install
            - bundle exec jekyll build --config "_config.yml,_config.dev.yml"
            - gem install s3_website
            - apt-get update
            - apt-get install --assume-yes openjdk-7-jre-headless
            - sed -i s/BUCKET_NAME/$DEV_BUCKET/g s3_website.yml
            - s3_website push

definitions:
  caches:
    bundler: vendor/bundle
Few things to note:
- you need to setup environment variables BUCKET_NAME, DEV_BUCKET, PROD_BUCKET in repo settings
- 's3_website' is a gem module that does the push to your S3 buckets
JEKYLL_ENV=production jekyll buildis important for your live site - bad things happen in PROD when this isn't set.bundle exec jekyll build --configwith 2 config yml files, the 2nd file has the "override" values.
Note: the performance of doing it this way is pretty poor IMO. You're building a container with bundler and the s3_website gem, and the generating the content inside that. While its cool and 'automated', its pretty overkill for making simple/quick changes to pages and wanting to see what it looks like before committing it to 'master' aka PROD.
Building my site
Now, given what I've just said about the length of time it takes to run the develop pipeline and preview changes I've made to my site, most of the time I just run my development locally.
I have jekyll installed on my laptop (xubuntu). Have a look here on how to install it for yourself.
Jekyll
What is Jekyll? Jekyll is a simple, blog-aware, static site generator. You create your content as text files (Markdown), and organize them into folders. Then, you build the shell of your site using Liquid-enhanced HTML templates. Jekyll automatically stitches the content and templates together, generating a website made entirely of static assets, suitable for uploading to any server. (from the Jekyll site)
This is a quick overview of what a "jekyll site" looks like
darthvaldr@hx0:~/development/cloudbuilder.io (develop)$ ll
total 560
drwxrwx--- 16 darthvaldr darthvaldr   4096 Jul 30 01:05 ./
drwxrwxr-x 15 darthvaldr darthvaldr  16384 Jul 23 13:50 ../
drwxrwx---  5 darthvaldr darthvaldr   4096 Aug  4 09:48 assets/
-rw-rw----  1 darthvaldr darthvaldr    634 Mar 20 20:24 banner.js
-rw-rw----  1 darthvaldr darthvaldr   1592 Apr 13 23:20 bitbucket-pipelines.yml
drwxrwx---  2 darthvaldr darthvaldr   4096 Mar 30 18:49 blog/
-rwxrwx---  1 darthvaldr darthvaldr    366 Jul 17 00:02 build_deploy_s3*
drwxrwx---  2 darthvaldr darthvaldr   4096 Mar 30 18:49 _building/
-rw-rw----  1 darthvaldr darthvaldr  56042 Mar 20 20:24 CHANGELOG.md
-rw-rw----  1 darthvaldr darthvaldr    770 Apr  7 21:27 _config.dev.yml
-rw-rw----  1 darthvaldr darthvaldr   8379 Mar 30 18:49 _config.yml
drwxrwx---  2 darthvaldr darthvaldr   4096 Mar 30 18:49 _data/
drwxrwx---  2 darthvaldr darthvaldr   4096 Jul 29 21:30 _documentation/
drwxrwx---  5 darthvaldr darthvaldr   4096 Jul 15 00:21 _drafts/
-rw-rw----  1 darthvaldr darthvaldr     37 Mar 20 20:24 Gemfile
-rw-rw----  1 darthvaldr darthvaldr   2722 Mar 20 20:24 Gemfile.lock
drwxrwx---  8 darthvaldr darthvaldr   4096 Aug  4 23:31 .git/
-rw-rw----  1 darthvaldr darthvaldr      6 Mar 30 18:49 .gitignore
drwxrwx---  6 darthvaldr darthvaldr   4096 Jun 24 15:14 _includes/
-rw-rw----  1 darthvaldr darthvaldr    423 Mar 20 20:24 index.md
-rw-rw----  1 darthvaldr darthvaldr 162344 Aug  5 22:12 .jekyll-metadata
drwxrwx---  2 darthvaldr darthvaldr   4096 Mar 20 20:24 _layouts/
-rw-rw----  1 darthvaldr darthvaldr   3478 Mar 20 20:24 LICENSE.txt
-rw-rw----  1 darthvaldr darthvaldr   1122 Mar 20 20:24 minimal-mistakes-jekyll.gemspec
-rw-rw----  1 darthvaldr darthvaldr   1132 Mar 20 20:24 package.json
drwxrwx---  2 darthvaldr darthvaldr   4096 Apr  2 13:00 _pages/
drwxrwx---  2 darthvaldr darthvaldr   4096 Jul 15 16:48 _posts/
drwxrwx---  3 darthvaldr darthvaldr   4096 Mar 20 20:24 _sass/
drwxrwx--- 14 darthvaldr darthvaldr   4096 Mar 30 18:49 .sass-cache/
drwxrwx--- 15 darthvaldr darthvaldr   4096 Jul 30 01:05 _site/
Quick notes
- posts go under _posts/ directory written in markdown
- all other folders starting with a "_" are other "pages" for your site
- "assets" folder holds your images, javascript and css files
- "_includes/" will be where all the theme type stuff goes - headers, footers, page templates used to populate the static pages.
- "_site/" is your static website - when you do a
jekyll buildit outputs your website into this folder. If you take this folder and host it on a webserver (e.g. /var/www/html/) you'll see your website.
So to build locally and preview, you run:
bundle exec jekyll serve --increment
Now you can open a browser and go to http://localhost:4000 to preview the site. Any changes you make to any files will automatically be picked up by jekyll and you can refresh your browser to keep preview your changes as you work.
Deploying my site
The standard 'CD' way of deploying my site was via the Bitbucket pipelines which would take my changes, build the static content and then use the s3_website gem module to push the static content up to the S3 buckets.
But my local (probably more practical) method of deploying my site after previewing it locally and being happy with my changes is to run the following script from my local machine which uses the AWS cli to push my static content up to the S3 buckets directly:
#!/usr/bin/env bash

echo "building site into _site..."
bundle exec jekyll build

echo "deploying _site/ to dev.cloudbuilder.io"
aws --profile cloudbuilder s3 cp --recursive _site/ s3://dev.cloudbuilder.io

echo "deploying to PRODUCTION"
JEKYLL_ENV=production jekyll build
aws --profile cloudbuilder s3 cp --recursive _site/ s3://cloudbuilder.io

echo "finished."
Quick Notes
- you need the aws cli application installed
- you need to setup your aws creds in
~/.aws/credentialswhich is also where the--profile cloudbuilderprofile is defined. - script just does a 'build' which puts the static content in "_site/" and then
awscli just copies (cp) this folders contents to the cloud.
Conclusion
Making my website an experiment in setting it up like it was a development project in the cloud complete with version control, build and deployment pipelines, a 'development' site, etc was a good exercise in thinking about it in broader terms than just hosting a website. I haven't even got monitoring involved in this which would be another exercise in its own right. Yes, its more maintenance and probably doesn't scale too well with this design, but it was a good exercise all the same.
Bonus: Improving Website Performance
I use Pingdom to scan my site.
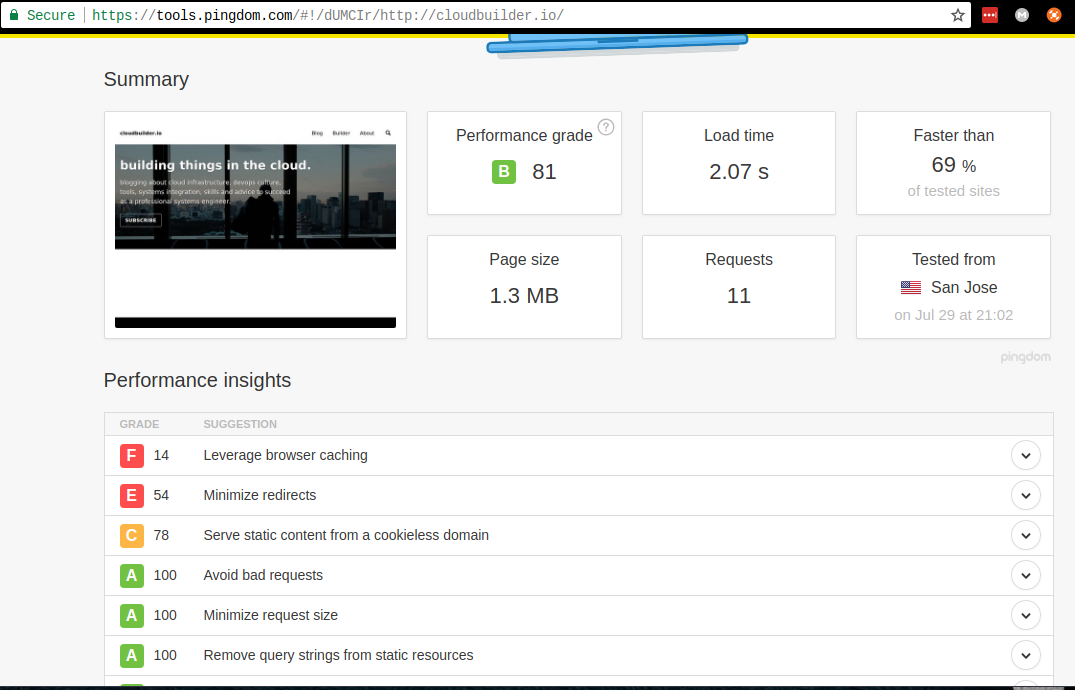
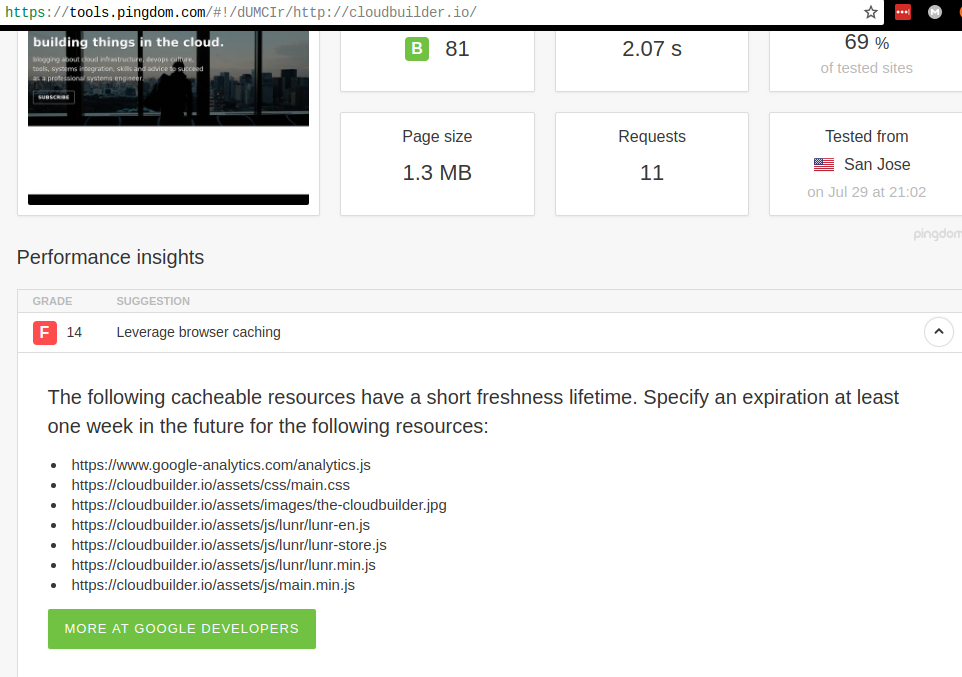
I read the recommendations under 'Performance insights'
 I
I
browser cache-control
Google Developers Page for Browser Cach Control
Common max-age values are:
One minute: max-age=60
One hour: max-age=3600
One day: max-age=86400
One week: max-age=604800
One month: max-age=2628000
One year: max-age=31536000
Need to add some http headers to the objects in my s3 bucket to cache them specifically
- Sign in to the AWS Management Console and open the Amazon S3 console at https://console.aws.amazon.com/s3.
- Click on your S3 bucket that hosts your static site
- Check the box of the objects or folder where the objects you want to add the cache-control header
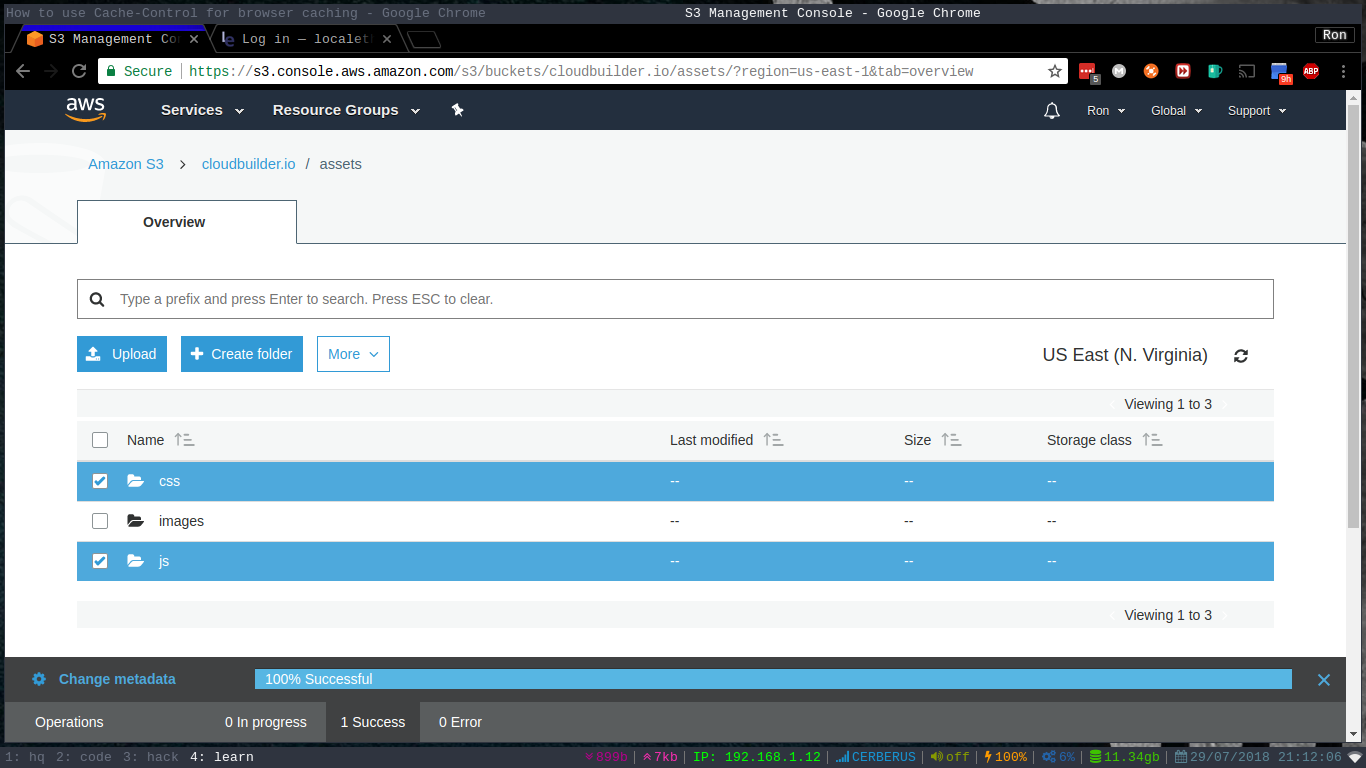
- Click 'More' and click 'Change Metadata'.
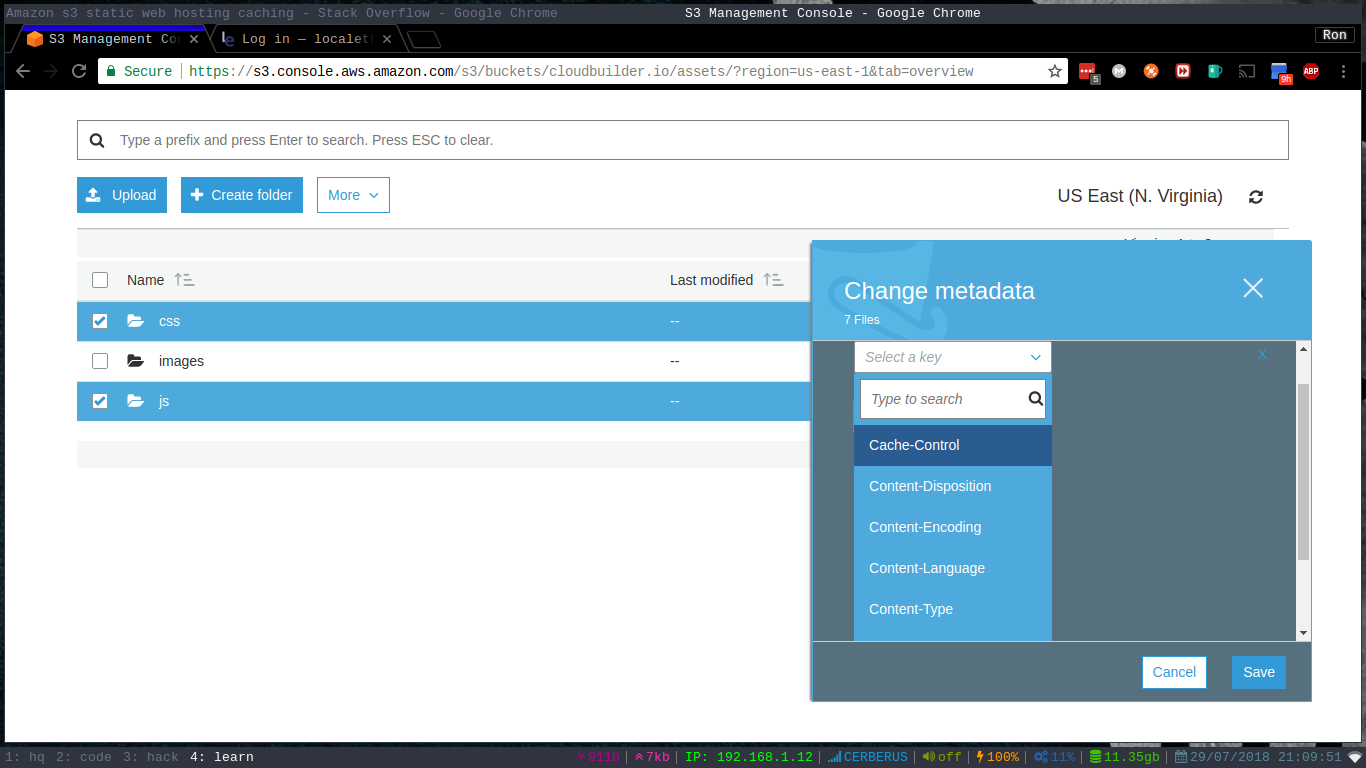
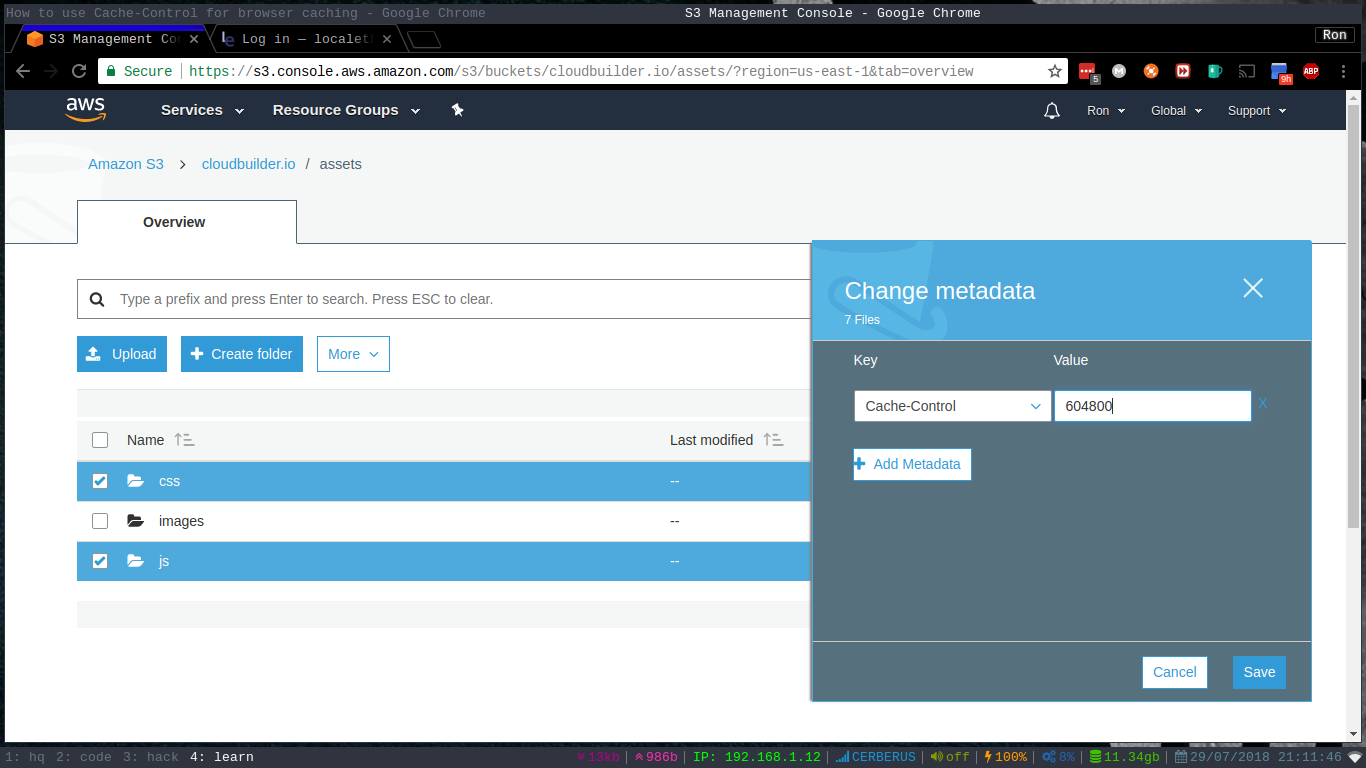
- Drop down menu to 'Cache-Control' and add your value in seconds (image is wrong, value should be "max-age=604800")
value: max-age=604800
 6. Select 'Save' review the next screen
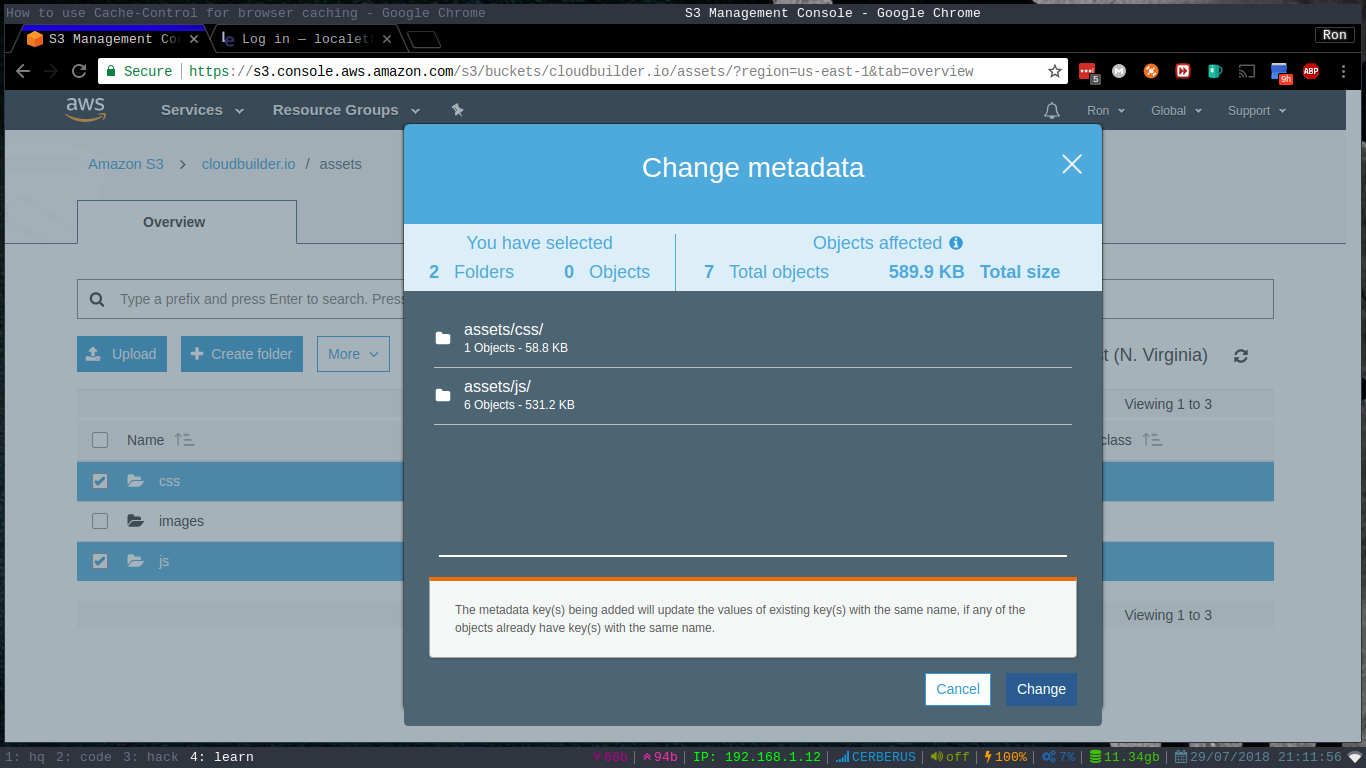 7. Select 'Change'
Now you've added browser cache-control to cache these objects for one week before it should try fetching new copy from origin.
note: cloudflare
Because I have cloudflare in front of my origin server doing caching, I have to set the "Browser Cache Expiration" setting to "Respect Existing Headers" so that what I've set on the s3 bucket objects will be honored by Cloudflare and passed onto the user. See here.
test with curl
darthvaldr@hx0:~ $ curl -I -D -v https://cloudbuilder.io/assets/images/the-cloudbuilder.jpg
HTTP/1.1 200 OK
Date: Sun, 29 Jul 2018 11:46:02 GMT
Content-Type: image/jpeg
Content-Length: 879098documentation
  - howto
  - infrastructure
CF-Cache-Status: EXPIRED
Expect-CT: max-age=604800, report-uri="https://report-uri.cloudflare.com/cdn-cgi/beacon/expect-ct"
Server: cloudflare
CF-RAY: 441f57b9eccc6575-SYD
you can see this asset is returning the max-age cache-control setting we set on this particular object.