Istio mTLS with SDS and Cert-Manager - Complete Service Mesh Security Guide
Published Date: 06-MAR-2020
In this post we will be setting up a way for Istio to automatically provision and manage LetsEncrypt Signed TLS certificates for use in Kubernetes clusters.
Why is this a big deal?
Certificate management is usually a painful experience, and over time and many certificates added, this becomes more overhead for operations teams to manage. Just having a setup that automates the whole thing for you is pretty nice.
Architecture Diagram
Brief overview of the component and moving parts of the solution (there'll be a few details missed out, but you get the overall picture):
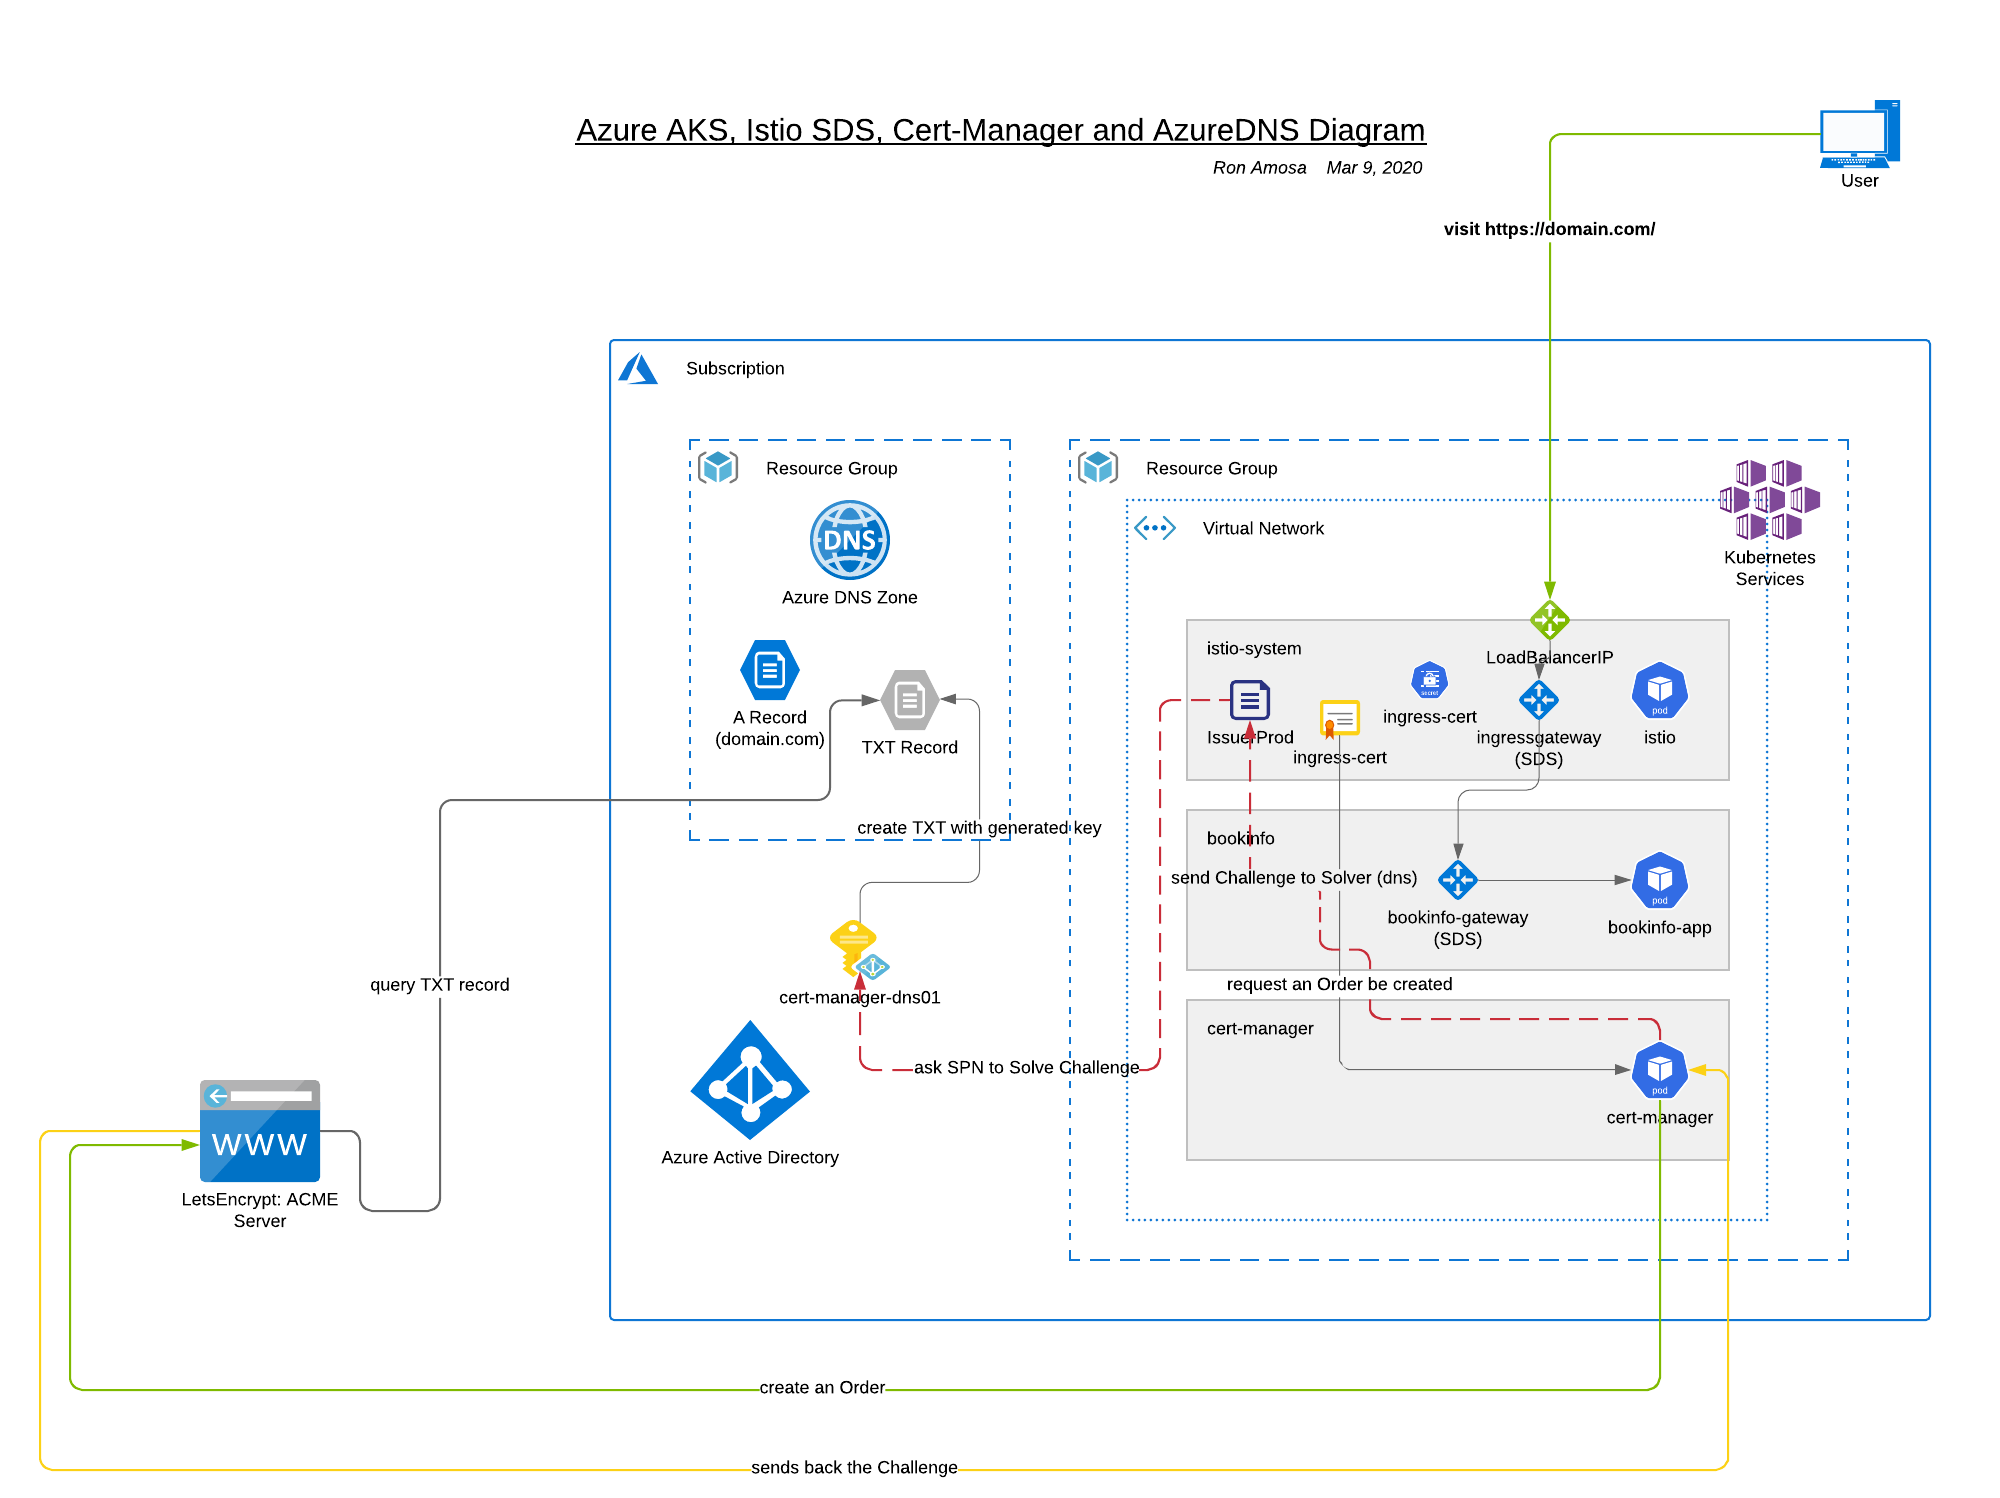
Key Components
- AKS cluster
- Istio Service Mesh
- SDS enabled Gateways
- Cert-Manager, Issuers, Certificates
- AzureDNS and DNS-01 ACME Challenge
Pre-requisites
- az-cli installed
- kubectl instlaled
- istioctl installed
- helm v3 installed
- a running AKS cluster (if you need a quick-setup cluster try this one: "aks starter cluster")
Istio Setup
With your newly built AKS cluster, make sure you have a copy of the kubeconfig file to run 'kubectl' commands:
az aks get-credentials --name AKS-CLUSTER-NAME --resource-group RESOURCE-GROUP-OF-AKS-CLUSTER
you can add --admin if your cluster is RBAC enabled, to get the admin kubeconfig, and --overwrite is handy to add too, but you'll get prompted to overwrite otherwise.
Check access to your cluster
run: kubectl get nodes
output:
NAME                               STATUS   ROLES   AGE   VERSION
aks-nodepool-38331632-vmss000000   Ready    agent   26h   v1.15.7
aks-nodepool-38331632-vmss000001   Ready    agent   26h   v1.15.7
aks-nodepool-38331632-vmss000002   Ready    agent   26h   v1.15.7
Download Istio & istioctl
install via curl:
$ curl -L https://istio.io/downloadIstio | sh -
setup the istioctl binary in your $PATH
current istio version as time of writing: 1.5.0
Install Istio with SDS enabled
What is SDS and why do I care?
'Secret Discovery Service (SDS)' is an envoyproxy feature that simplifies certificate management for proxy containers. This means for Istio, all the sidecars and their TLS needs are taken care of by enabling and configuring SDS in Istio for the k8s cluster. The TLS required private key, server certificate, and root certificate, are configured using the Secret Discovery Service (SDS). The ingress gateway can dynamically add, delete, or update its key/certificate pairs and its root certificate. You do not have to restart the ingress gateway.
using istioctl run:
istioctl manifest apply \
  --set profile=default \
  --set values.gateways.istio-egressgateway.enabled=false \
  --set values.gateways.istio-ingressgateway.sds.enabled=true
- use
defaultprofile - disable
egressgateway - enable SDS on
ingressgateway
this will install istio system in the istio-system namespace by default, you can check by running:
kubectl -n istio-system get pods
NAME                                    READY   STATUS    RESTARTS   AGE
istio-ingressgateway-8577f4c6f8-nc7fb   1/1     Running   0          26h
istiod-59f6fbc78f-76vs6                 1/1     Running   0          26h
prometheus-868cf4cb84-jr8zf             2/2     Running   0          26h
patch istio ingressgateway
the default ingress gateway (called ingressgateway) installation comes without HTTPS/tls added or configured:
Name:         ingressgateway
Namespace:    istio-system
Labels:       operator.istio.io/component=IngressGateways
              operator.istio.io/managed=Reconcile
              operator.istio.io/version=1.5.0
              release=istio
Annotations:  kubectl.kubernetes.io/last-applied-configuration:...
API Version:  networking.istio.io/v1beta1
Kind:         Gateway
Metadata:
  Creation Timestamp:  2020-03-07T01:38:00Z
  Generation:          2
  Resource Version:    2113
  Self Link:           /apis/networking.istio.io/v1beta1/namespaces/istio-system/gateways/ingressgateway
  UID:                 48a034e9-e83e-45c3-a6dc-ce969bcecfc2
Spec:
  Selector:
    Istio:  ingressgateway
  Servers:
    Hosts:
      *
    Port:
      Name:      http
      Number:    80
      Protocol:  HTTP
Events:                 <none />
run this json patch command to update the gateway:
kubectl -n istio-system \
  patch gateway ingressgateway --type=json \
  -p="$(cat patch.json)"
patch.json:
[{"op": "add","path": "/spec/servers/1","value": {"hosts": ["*"], "port": {"name": "https-443","number": 443,"protocol": "HTTPS"},"tls": {"credentialName": "ingress-cert", "mode": "SIMPLE"\}\}}]
so now your ingressgateway gateway should look like this:
Name:         ingressgateway
Namespace:    istio-system
Labels:       operator.istio.io/component=IngressGateways
              operator.istio.io/managed=Reconcile
              operator.istio.io/version=1.5.0
              release=istio
Annotations:  kubectl.kubernetes.io/last-applied-configuration:...
API Version:  networking.istio.io/v1beta1
Kind:         Gateway
Metadata:
  Creation Timestamp:  2020-03-07T01:38:00Z
  Generation:          2
  Resource Version:    2113
  Self Link:           /apis/networking.istio.io/v1beta1/namespaces/istio-system/gateways/ingressgateway
  UID:                 48a034e9-e83e-45c3-a6dc-ce969bcecfc2
Spec:
  Selector:
    Istio:  ingressgateway
  Servers:
    Hosts:
      *
    Port:
      Name:      http
      Number:    80
      Protocol:  HTTP
    Hosts:
      *
    Port:
      Name:      https-443
      Number:    443
      Protocol:  HTTPS
    Tls:
      Credential Name:  ingress-cert
      Mode:             SIMPLE
Events:                 <none />
Checkpoint
At this point you should have the following things in place:
- a running AKS cluster
- an Istio installation in the
istio-systemnamespace - an
ingressgatewaygateway with HTTPS and TLS configured.
Install Bookinfo Demo Application
We need to install an application to demonstrate a valid TLS certificate on, and also show how that tls certificate is used for mutual TLS (mTLS) by Istio.
I will use my domain cloudbuild.site as the domain for this example, and configure the bookinfo application to route to subdomain bookinfo.cloudbuild.site.
create new namespace
kubectl create ns bookinfo
label namespace for instio sidecar injection
kubectl label namespace bookinfo istio-injection=enabled
deploy the bookinfo app into the bookinfo namespace
kubectl -n bookinfo apply -f https://raw.githubusercontent.com/istio/istio/release-1.5/samples/bookinfo/platform/kube/bookinfo.yaml
check pods
kubectl -n bookinfo get pods
you should see something like this:
NAME                              READY   STATUS    RESTARTS   AGE
details-v1-74f858558f-xx97s       2/2     Running   0          21h
productpage-v1-76589d9fdc-9qbf9   2/2     Running   0          21h
ratings-v1-7855f5bcb9-x9lxz       2/2     Running   0          21h
reviews-v1-64bc5454b9-95dt4       2/2     Running   0          21h
reviews-v2-76c64d4bdf-8v2vm       2/2     Running   0          21h
reviews-v3-5545c7c78f-j4wlb       2/2     Running   0          21h
each pod is 2/2 because now an istio side-car container is added to your pod deployment.
Install modified gateway
The default bookinfo gateway needed to be modified because we are using TLS certs in this demo - note I am using my own domain cloudbuild.site and routing requests to subdomain bookinfo.cloudbuild.site, so where you see my domain, substitute for yours.
The gateway needs to look like this:
apiVersion: networking.istio.io/v1alpha3
kind: Gateway
metadata:
  name: bookinfo-gateway
spec:
  selector:
    istio: ingressgateway # use istio default controller
  servers:
  - port:
      number: 80
      name: http
      protocol: HTTP
    hosts:
    - "bookinfo.cloudbuild.site"
    tls:
      httpsRedirect: true
  - port:
      number: 443
      name: https-443
      protocol: HTTPS
    tls:
      mode: SIMPLE
      credentialName: ingress-cert
    hosts:
      - "bookinfo.cloudbuild.site"
---
apiVersion: networking.istio.io/v1alpha3
kind: VirtualService
metadata:
  name: bookinfo
spec:
  hosts:
  - "bookinfo.cloudbuild.site"
  gateways:
  - bookinfo-gateway
  http:
  - match:
    - uri:
        exact: /productpage
    - uri:
        prefix: /static
    - uri:
        exact: /login
    - uri:
        exact: /logout
    - uri:
        prefix: /api/v1/products
    route:
    - destination:
        host: productpage
        port:
          number: 9080
save this to a file called bookinfo-gateway.yaml and deploy like this:
kubectl -n bookinfo apply -f ./bookinfo-gateway.yaml
check it with:
kubectl -n bookinfo describe gw bookinfo
Install Cert-Manager
What is cert-manager and why should I care?
Cert-Manager provides "x509 certificate management for Kubernetes" by making Certificate Authorities (CA) and Certificates first-class resource types in the Kubernetes API (literally paraphrasing the blurb from the cert-manager site).
Basically it's a system that makes it really simple to automatically provision and manage CA-signed certificates for your cluster.
These are the instructions from cert-manager docs but I'm summarizing them here:
Pick ONE of the following methods
via kubectl
kubectl apply --validate=false -f https://github.com/jetstack/cert-manager/releases/download/v0.13.1/cert-manager.yaml
via helm
create Namespace:
kubectl create namespace cert-manager
label Namespace to disable validation:
kubectl label namespace cert-manager certmanager.k8s.io/disable-validation=true
check and delete any existing cert-manager releases:
helm -n cert-manager list
helm -n cert-manager delete cert-managerAs an example setup
add cert-manager to the repo, and install:
helm repo add jetstack https://charts.jetstack.io

helm repo update

helm install \
  cert-manager jetstack/cert-manager \
  --namespace cert-manager \
  --version v0.13.1
Check cert-manager installation
run:
kubectl -n cert-manager get pods
output:
NAME                                       READY   STATUS    RESTARTS   AGE
cert-manager-6f9d54fdc7-jl6wv              1/1     Running   0          26h
cert-manager-cainjector-6b6c7955f4-whvjm   1/1     Running   0          26h
cert-manager-webhook-84954f5587-bmkpc      1/1     Running   0          26h
Setup Azure DNS for ACME Challenge
Wait, why are we setting up DNS?
For this automation, we will use cert-managers 'Automated Certificate Management Envrionment (ACME)' Issuer. The ACME Issuer has 2 methods to verify you own a domain. These methods are called "challenges", and the Issuer has to solve them to verify you own the domain.
One is via HTTP:
HTTP01 challenges are completed by presenting a computed key, that should be present at a HTTP URL endpoint and is routable over the internet. This URL will use the domain name requested for the certificate. Once the ACME server is able to get this key from this URL over the internet, the ACME server can validate you are the owner of this domain. When a HTTP01 challenge is created, cert-manager will automatically configure your cluster ingress to route traffic for this URL to a small web server that presents this key.
basically your Issuer has to get agenerated key served somewhere on your web server via that domain, proves you own the domain. solved.
The other is via DNS:
DNS01 challenges are completed by providing a computed key that is present at a DNS TXT record. Once this TXT record has been propagated across the internet, the ACME server can successfully retrieve this key via a DNS lookup and can validate that the client owns the domain for the requested certificate. With the correct permissions, cert-manager will automatically present this TXT record for your given DNS provider.
again, but via DNS records, your Issuer has to get a generated key entered into your DNS records, proves you own the domain. solved.
Azure DNS Zone
For this setup you need an Azure DNS Zone setup.
Go to your Azure Portal and create a DNS Zone, and then take note of the Name Servers, for example I made a zone called cloudbuild.site for my domain of the same name:

Update domain registrar nameservers
My domain cloudbuild.site is registered at https://www.gandi.net/en-NZ, so I go there and change all the nameservers to point to my new Azure DNS Zone.
So when I query the nameservers for my domain cloudbuild.site, I should see this:
dig NS cloudbuild.site

; <<>> DiG 9.11.3-1ubuntu1.11-Ubuntu <<>> NS cloudbuild.site
;; global options: +cmd
;; Got answer:
;; ->>HEADER<<- opcode: QUERY, status: NOERROR, id: 33922
;; flags: qr rd ra; QUERY: 1, ANSWER: 4, AUTHORITY: 0, ADDITIONAL: 1

;; OPT PSEUDOSECTION:
; EDNS: version: 0, flags:; udp: 65494
;; QUESTION SECTION:
;cloudbuild.site.		IN	NS

;; ANSWER SECTION:
cloudbuild.site.	3599	IN	NS	ns1-06.azure-dns.com.
cloudbuild.site.	3599	IN	NS	ns3-06.azure-dns.org.
cloudbuild.site.	3599	IN	NS	ns2-06.azure-dns.net.
cloudbuild.site.	3599	IN	NS	ns4-06.azure-dns.info.

;; Query time: 46 msec
;; SERVER: 127.0.0.53#53(127.0.0.53)
;; WHEN: Sun Mar 08 18:57:30 NZDT 2020
;; MSG SIZE  rcvd: 181
now we're ready to setup the azure dns solver!
azuredns-config setup
The bot that solves the dns-01 challenge for our Issuer is a service principal with the permissions to create a DNS record in our new Azure DNZ Zone.
Not too complicated, aye.
Use this script (I called it setup_azuredns.sh) to create the necessary cert-manager-dns01 service principal (note, you need jq or jshon installed ), example:
#!/bin/bash

AZURE_CERT_MANAGER_SP_NAME="cert-manager-dns01"
AZURE_CERT_MANAGER_DNS_RESOURCE_GROUP="azuredns-rg-prod" # this is the resource group from the DNS Zone you created earlier
AZURE_CERT_MANAGER_DNS_NAME="cloudbuild.site"

DNS_SP=$(az ad sp create-for-rbac --name $AZURE_CERT_MANAGER_SP_NAME)
AZURE_CERT_MANAGER_SP_APP_ID=$(echo $DNS_SP | jq -r '.appId')
AZURE_CERT_MANAGER_SP_PASSWORD=$(echo $DNS_SP | jq -r '.password')
AZURE_TENANT_ID=$(echo $DNS_SP | jq -r '.tenant')
AZURE_SUBSCRIPTION_ID=$(az account show | jq -r '.id')

# Lower the Permissions of the SP
az role assignment delete --assignee $AZURE_CERT_MANAGER_SP_APP_ID --role Contributor

# Give Access to DNS Zone
DNS_ID=$(az network dns zone show --name $AZURE_CERT_MANAGER_DNS_NAME --resource-group $AZURE_CERT_MANAGER_DNS_RESOURCE_GROUP --query "id" --output tsv)

az role assignment create --assignee $AZURE_CERT_MANAGER_SP_APP_ID --role "DNS Zone Contributor" --scope $DNS_ID

# Check Permissions
az role assignment list --assignee $AZURE_CERT_MANAGER_SP_APP_ID

# Create Secret -- delete existing first.
kubectl delete secret azuredns-config

kubectl create secret generic azuredns-config \
  --from-literal=CLIENT_SECRET=$AZURE_CERT_MANAGER_SP_PASSWORD

# Get the Service Principal App ID for configuration
echo "Principal: $AZURE_CERT_MANAGER_SP_APP_ID"
echo "Password: $AZURE_CERT_MANAGER_SP_PASSWORD"
echo "Tenant ID: $AZURE_TENANT_ID"
echo "Subscription ID: $AZURE_SUBSCRIPTION_ID"
You need the Principal & Password for the Issuer section below.
the script will:
- creates a service principal (SPN)
- give SPN access to existing DNS Zone
- create a k8s secret called
azuredns-configwith the SPN's secret/password.
the script comes from cert-manager.io, modifications by me.
azuredns-config secret
This secret needs to be in the same namespace as your Issuer - so maybe add -n <namespace /> to the script, or create it manually.
The secret is created in the setup_azuredns.sh script but if you need to manually create it:
kubectl -n <NAMESPACE_WHERE_ISSUER_IS /> create secret generic azuredns-config --from-literal=CLIENT_SECRET=<secret_goes_here />
take note of the CLIENT_SECRET bit as the required reference to the secret later on.
letsencrypt has 2 acme servers, a staging and a production one - we will use the production one.
Create Issuer & Certificates
Production Issuer
This is my prod Issuer (as an example) - read the comments and substitute accordingly:
apiVersion: cert-manager.io/v1alpha2
kind: Issuer
metadata:
  name: letsencrypt-prod
spec:
  acme:
    server: https://acme-v02.api.letsencrypt.org/directory
    email: [email protected] # change to your email address.
    privateKeySecretRef:
      name: letsencrypt-prod
    solvers:
    - dns01:
        azuredns:
          clientID: XXXXXXXXXXXXXXXXXXXXX # this the Principal from the 'setup_azuredns.sh'
          clientSecretSecretRef:
            name: azuredns-config
            key: CLIENT_SECRET
          subscriptionID: YOUR-SUBSCRIPTION-ID
          tenantID: YOUR-TENANT-ID
          resourceGroupName: YOUR-DNS-ZONES-RESOURCEGROUP-NAME
          hostedZoneName: cloudbuild.site # change to your domain.
          environment: AzurePublicCloud # leave this as-is.
save to IssuerProd.yaml and because we want istio's ingressgateway in istio-system namespace to find and use the cert via SDS, we need to ensure the following 3 things are all deployed in the istio-system namespace:
- azuredns-config secret
- production Issuer
- production Certificate
deploy the Issuer:
kubectl -n istio-system apply -f ./IssuerProd.yaml
Production Certificate
This is my prod Certificate (as an example) - read the comments and substitute accordingly:
apiVersion: cert-manager.io/v1alpha2
kind: Certificate
metadata:
  name: ingress-cert
spec:
  secretName: ingress-cert
  issuerRef:
    name: letsencrypt-prod
    kind: Issuer
  commonName: bookinfo.cloudbuild.site
  dnsNames:
  - bookinfo.cloudbuild.site
  acme:
    config:
    - dns01:
        provider: azuredns
      domains:
      - cloudbuild.site
save to CertProd.yaml and deploy into the istio-system namespace:
kubectl -n istio-system apply -f ./CertProd.yaml
Check cert-manager logs
Once you deploy the cert, if everything is setup correctly you should see logs like this :
I0307 08:21:35.667035       1 controller.go:135] cert-manager/controller/orders "msg"="finished processing work item" "key"="istio-system/ingress-cert-1810009586-3587251712"
I0307 08:21:38.181385       1 dns.go:121] cert-manager/controller/challenges/Check "msg"="checking DNS propagation" "dnsName"="bookinfo.cloudbuild.site" "domain"="bookinfo.cloudbuild.site" "resource_kind"="Challenge" "resource_name"="ingress-cert-1810009586-3587251712-2272992580" "resource_namespace"="istio-system" "type"="dns-01" "nameservers"=["10.0.0.10:53"]
I0307 08:21:49.666500       1 dns.go:133] cert-manager/controller/challenges/Check "msg"="waiting DNS record TTL to allow the DNS01 record to propagate for domain" "dnsName"="bookinfo.cloudbuild.site" "domain"="bookinfo.cloudbuild.site" "resource_kind"="Challenge" "resource_name"="ingress-cert-1810009586-3587251712-2272992580" "resource_namespace"="istio-system" "type"="dns-01" "fqdn"="_acme-challenge.bookinfo.cloudbuild.site." "ttl"=60
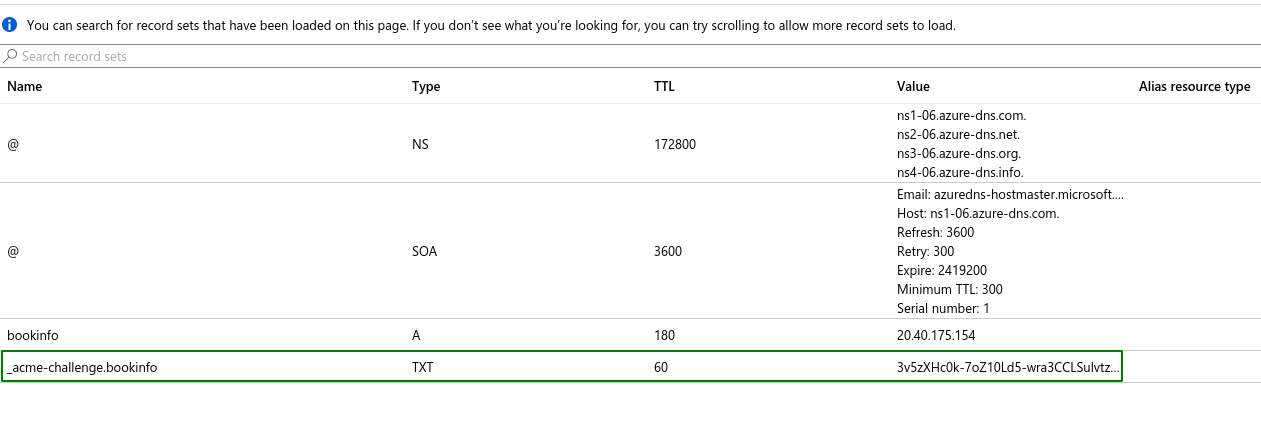
Once you see all sorts of successful activity happening, go to your Azure Portal and check your DNS Zone. All going well, you'll see a new TXT record with a hash value like this:
Check the cert resource via kubectl:
# kubectl -n istio-system describe certs
Name:         ingress-cert
Namespace:    istio-system
Labels:       <none />
Annotations:  kubectl.kubernetes.io/last-applied-configuration:...
API Version:  cert-manager.io/v1alpha2
Kind:         Certificate
Metadata:
  Creation Timestamp:  2020-03-07T08:21:31Z
  Generation:          1
  Resource Version:    69741
  Self Link:           /apis/cert-manager.io/v1alpha2/namespaces/istio-system/certificates/ingress-cert
  UID:                 c97b2f16-4e32-4b48-9692-dfa94e9761fe
Spec:
  Common Name:  bookinfo.cloudbuild.site
  Dns Names:
    bookinfo.cloudbuild.site
  Issuer Ref:
    Kind:       Issuer
    Name:       letsencrypt-prod
  Secret Name:  ingress-cert
Status:
  Conditions:
    Last Transition Time:  2020-03-07T08:23:12Z
    Message:               Certificate is up to date and has not expired
    Reason:                Ready
    Status:                True
    Type:                  Ready
  Not After:               2020-06-05T07:23:11Z
Events:
  Type    Reason     Age   From          Message
  ----    ------     ----  ----          -------
  Normal  Requested  12m   cert-manager  Created new CertificateRequest resource "ingress-cert-1810009586"
  Normal  Issued     10m   cert-manager  Certificate issued successfully
Verify Certificate via OpenSSL
openssl s_client -connect bookinfo.cloudbuild.site:443
results, we see:
- LetsEncrypt Authority
- CN of 'bookinfo.cloudbuild.site'
- Signed Certificate
CONNECTED(00000005)
depth=2 O = Digital Signature Trust Co., CN = DST Root CA X3
verify return:1
depth=1 C = US, O = Let's Encrypt, CN = Let's Encrypt Authority X3
verify return:1
depth=0 CN = bookinfo.cloudbuild.site
verify return:1
---
Certificate chain
 0 s:CN = bookinfo.cloudbuild.site
   i:C = US, O = Let's Encrypt, CN = Let's Encrypt Authority X3
 1 s:C = US, O = Let's Encrypt, CN = Let's Encrypt Authority X3
   i:O = Digital Signature Trust Co., CN = DST Root CA X3
---
Server certificate
-----BEGIN CERTIFICATE-----
MIIFaDCCBFCgAwIBAgISA/EH7xvZBS+ir5NoJM3ozbrHMA0GCSqGSIb3DQEBCwUA
MEoxCzAJBgNVBAYTAlVTMRYwFAYDVQQKEw1MZXQncyBFbmNyeXB0MSMwIQYDVQQD
ExpMZXQncyBFbmNyeXB0IEF1dGhvcml0eSBYMzAeFw0yMDAzMDcwNzIzMTFaFw0y
MDA2MDUwNzIzMTFaMCMxITAfBgNVBAMTGGJvb2tpbmZvLmNsb3VkYnVpbGQuc2l0
ZTCCASIwDQYJKoZIhvcNAQEBBQADggEPADCCAQoCggEBAN6NdP6aMOyGV91eYKxY
/PQUDOUGzvFGcf2hiAtf0rEycNHDsY8WGockRECDXfj+Z+q1WFwcuKP40Netc3K/
4Ywnmg1P8Vt46R57QcsV43rBtC+aDCGR8vJPiUGxHbkzMqLSUmCHqupt6OmZdlxl
0AjMd40+NboiKqKCYPTE/xtSoH8dCqEhRKIDZK1unFxOv4wQbV7lMYRwlfmv05zr
yTBozqGcwx3WU3I90cN8UKisbg5enb5DZGl3rRozRHZkXXg0gBiRzfr0xxA65nQ0
BJ3LpIehjavprSzVDXGmuIVqLS3ZRgYxqzaYdohNZZN/JhjUlZqTpcm+Gzyj2iPh
YmUCAwEAAaOCAm0wggJpMA4GA1UdDwEB/wQEAwIFoDAdBgNVHSUEFjAUBggrBgEF
BQcDAQYIKwYBBQUHAwIwDAYDVR0TAQH/BAIwADAdBgNVHQ4EFgQUlZgrZj4o3utB
bjhVZfPFsW6ouCgwHwYDVR0jBBgwFoAUqEpqYwR93brm0Tm3pkVl7/Oo7KEwbwYI
KwYBBQUHAQEEYzBhMC4GCCsGAQUFBzABhiJodHRwOi8vb2NzcC5pbnQteDMubGV0
c2VuY3J5cHQub3JnMC8GCCsGAQUFBzAChiNodHRwOi8vY2VydC5pbnQteDMubGV0
c2VuY3J5cHQub3JnLzAjBgNVHREEHDAaghhib29raW5mby5jbG91ZGJ1aWxkLnNp
dGUwTAYDVR0gBEUwQzAIBgZngQwBAgEwNwYLKwYBBAGC3xMBAQEwKDAmBggrBgEF
BQcCARYaaHR0cDovL2Nwcy5sZXRzZW5jcnlwdC5vcmcwggEEBgorBgEEAdZ5AgQC
BIH1BIHyAPAAdgCyHgXMi6LNiiBOh2b5K7mKJSBna9r6cOeySVMt74uQXgAAAXC0
F08nAAAEAwBHMEUCIFKe+kYtgTIPYGjL1vL54oSias4Sn6nx6SGwQzWS6R8SAiEA
hgJcnoKZXFX2Esz4jKFWTrft4Pz8XlUFhTKfoSHoQeQAdgBvU3asMfAxGdiZAKRR
Ff93FRwR2QLBACkGjbIImjfZEwAAAXC0F096AAAEAwBHMEUCIH/cLlIYaGNTUWZA
Lweli4M14z6k1hs9Rmk3E+eVCOTxAiEAj3NtSBT578yvCCD8IhtVzPHBILWsyC8o
HB/LKG78IrIwDQYJKoZIhvcNAQELBQADggEBAANnWf1U4PYT49n6b97GvGD1xE4i
JWJfuOqpT39dvIfx4YA0WhrzN4LwpdR+pejNDThs08usqvKIqCxY5SGSQY9Mip57
9r26qHN+Om3ufI/mZ81fvtH6PJQ0YgFG0kGMY/wZ4pZu2P2KwH5Tv2gGI4ZDl3tC
cclqL4qn9+eMaxqF1mO1wE7HTNpo+aiyKupdLTau6GH9vfyxj/Z17UAUfi8mugnX
OxoyXx5d7U5Zi3ofJv1YfxFCoPNttyWhoWX2odHzoAvRDazzDy/bWmzPsM3gPeYC
GwdWUCABDkwRosiD0zs1YHjeSkTSkCa0snRZJi3reeC+zNbtyZ+O3VstYeQ=
-----END CERTIFICATE-----
subject=CN = bookinfo.cloudbuild.site

issuer=C = US, O = Let's Encrypt, CN = Let's Encrypt Authority X3

---
No client certificate CA names sent
Peer signing digest: SHA256
Peer signature type: RSA-PSS
Server Temp Key: X25519, 253 bits
---
SSL handshake has read 3057 bytes and written 406 bytes
Verification: OK
SUCCESS!!
Now you can browse and use your bookinfo app at https://bookinfo.cloudbuild.site/productpage with a valid TLS certificate, and working cert-manager and SDS setup with Azure DNS challenge solver!
I know this was pretty long, so any question, please feel free to ping me online, probably on Twitter