Pi-hole with Unbound DNS: Complete Docker Setup for Privacy & Ad-Blocking
This guide walks through setting up Pi-hole with Unbound as a recursive DNS resolver using Docker. This combination provides ad-blocking functionality while ensuring DNS privacy by avoiding third-party DNS providers.
This guide is based on real-world implementation and troubleshooting. Each step represents hard-earned knowledge from overcoming various challenges.
Related Networking & Infrastructure Guides
🌐 DNS & Network Security: Expand your networking infrastructure:
- DNS Optimization: Pi-hole DNS Configuration - Advanced DNS setup and performance tuning
- Security Monitoring: Pi-hole Compromise Detection - Network security and intrusion detection
- DNS Troubleshooting: Pi-hole SERVFAIL Issues - Resolve common DNS problems
🏗️ Infrastructure Integration: Connect with broader home lab setup:
- Virtualization Platform: Proxmox Virtualization Hub - Host Pi-hole on Proxmox VMs
- Container Orchestration: Kubernetes Deployment - Scale DNS services with K8s
- Complete Lab Guide: Home Lab Infrastructure Hub - Full networking and automation setup
Prerequisites
- Linux server with Docker and Docker Compose installed
- Basic knowledge of networking concepts
- Root or sudo access
- A user with docker permissions to be the pihole user.
Overview
Our setup consists of two Docker containers:
- Pi-hole: For ad-blocking and DNS management
- Unbound: For recursive DNS resolution
Initial Setup
Here are the commands to create a dedicated user for running Pi-hole in Docker:
- Create the user:
sudo useradd -m -s /bin/bash piholeuser
- Set a password (optional but recommended):
sudo passwd piholeuser
- Add user to the Docker group:
sudo usermod -aG docker piholeuser
- Create a directory for Pi-hole Docker files:
sudo mkdir -p /opt/pihole
sudo chown piholeuser:piholeuser /opt/pihole
- If using Docker socket-based permission (alternative to Docker group):
sudo setfacl -m user:piholeuser:rw /var/run/docker.sock
You'll need to log out and back in for group changes to take effect. To switch to the new user:
su - piholeuser
Create Project Directory Structure
mkdir -p ~/pihole/{pihole,dnsmasq,unbound}
cd ~/pihole
Docker Compose Configuration
Using proper container capabilities and permissions is crucial. Missing or incorrect permissions will lead to segmentation faults and permission errors.
Create a docker-compose.yml file with the following content:
version: '3.8'
services:
pihole:
container_name: pihole
image: pihole/pihole:latest
ports:
- "53:53/tcp"
- "53:53/udp"
- "80:80/tcp"
environment:
TZ: "Pacific/Auckland" # Replace with your timezone
WEBPASSWORD: "password" # Change this!
DNSMASQ_LISTENING: "all"
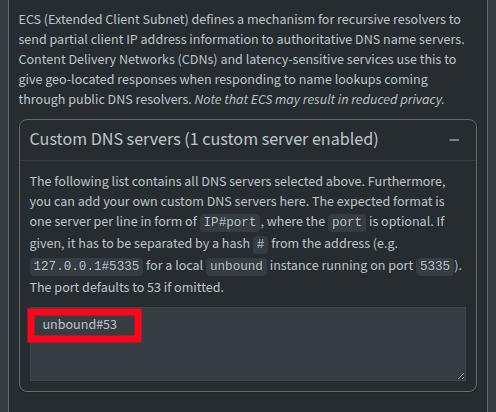
PIHOLE_DNS_1: "unbound#53" # Point to unbound container
volumes:
- ./pihole:/etc/pihole
- ./dnsmasq:/etc/dnsmasq.d
restart: unless-stopped
networks:
dns_network:
cap_add:
- NET_ADMIN
- NET_RAW
- CAP_SYS_NICE
- CAP_SYS_TIME
security_opt:
- seccomp:unconfined
depends_on:
- unbound
unbound:
container_name: unbound
image: klutchell/unbound:latest
volumes:
- ./unbound:/etc/unbound/custom.conf.d
restart: unless-stopped
networks:
dns_network:
networks:
dns_network:
driver: bridge
Configure Unbound
- Create the Unbound configuration file:
cat > unbound/unbound.conf << EOF
server:
    verbosity: 1
    interface: 0.0.0.0
    port: 53
    do-ip4: yes
    do-udp: yes
    do-tcp: yes

    # May be set to yes if you have IPv6 connectivity
    do-ip6: no

    # Use this only when you downloaded the list of primary root servers!
    root-hints: /etc/unbound/custom.conf.d/root.hints

    # Trust glue only if it is within the servers authority
    harden-glue: yes

    # Require DNSSEC data for trust-anchored zones, if no DNSSEC data for an answer,
    # with trust anchors enabled, the zone becomes Bogus
    harden-dnssec-stripped: yes

    # Don't use capitalization randomization
    use-caps-for-id: no

    # Reduce EDNS reassembly buffer size
    edns-buffer-size: 1472

    # Perform prefetching of close to expired message cache entries
    prefetch: yes

    # One thread should be sufficient
    num-threads: 1

    # Ensure kernel buffer is large enough (reduced to avoid permission warnings)
    so-rcvbuf: 400k

    # Ensure privacy of local IP ranges
    private-address: 192.168.0.0/16
    private-address: 169.254.0.0/16
    private-address: 172.16.0.0/12
    private-address: 10.0.0.0/8
    private-address: fd00::/8
    private-address: fe80::/10
EOF
After starting Unbound, check the logs to confirm your custom configuration is being loaded:
# Check startup logs for your custom settings
docker logs unbound --tail=20

# Look for these indicators that your config is working:
# - "so-rcvbuf" warnings (shows your buffer size setting is applied)
# - Verbosity level messages (info/debug logs if verbosity > 0)
# - "start of service" message
# - Any errors about your specific config paths
Good signs: Warnings about buffer sizes, detailed log messages, successful startup Bad signs: Only basic startup messages, no mention of your custom settings
- Download the root hints file:
curl -o unbound/root.hints https://www.internic.net/domain/named.root
Configure dnsmasq for Pi-hole
Create a custom configuration file for dnsmasq to allow queries from all networks:
cat > dnsmasq/02-lan-access.conf << EOF
# Allow all interfaces
listen-address=0.0.0.0
bind-interfaces
domain-needed
bogus-priv
EOF
Starting the Containers
Start the containers:
docker-compose up -d
Configuring Pi-hole
Access the Pi-hole web interface at http://host-server-ip/admin/ (password is what you set in docker-compose.yml).
Important Pi-hole Settings
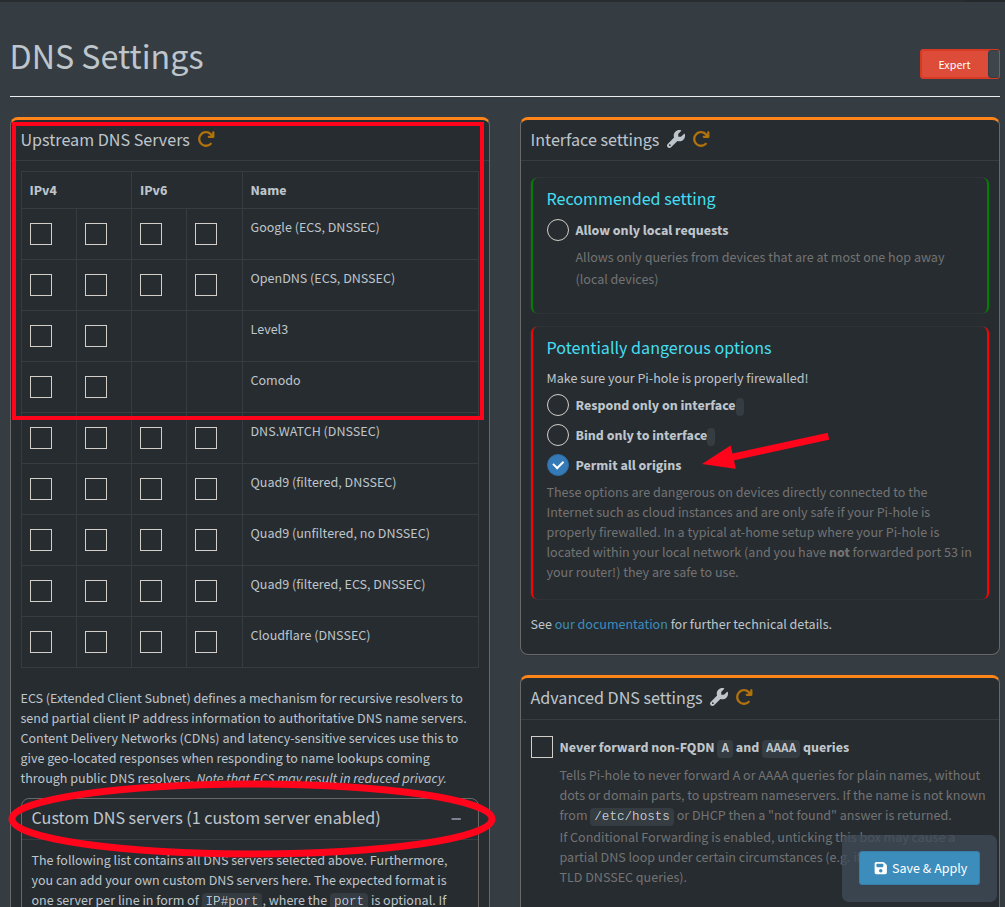
- DNS Settings:
- Go to Settings > DNS
- Uncheck all upstream DNS providers
- Make sure it shows your unbound container is set as the upstream DNS
- Under Interface settings, select "Permit all origins" to allow queries from all networks
![DNS Settings Screenshot Placeholder]
- Domain Settings:
- Set your local domain (example: "playtime.lan")
- Enable "Expand hostnames" if you want to use simple hostnames in your local network
Custom settings, unbound is our upstream:
Host Configuration
To prevent DNS leaks, configure your host server to use Pi-hole for DNS:
Make /etc/resolv.conf Immutable
# Edit resolv.conf to use Pi-hole
echo "nameserver 127.0.0.1" | sudo tee /etc/resolv.conf

# Make it immutable to prevent DHCP from changing it
sudo chattr +i /etc/resolv.conf
Configure dhclient
If you don't prevent DHCP from overwriting your DNS settings, your host might revert to using external DNS providers, causing DNS leaks.
sudo vim /etc/dhcp/dhclient.conf
Add:
supersede domain-name-servers 127.0.0.1;
Configure Docker DNS
Create or edit /etc/docker/daemon.json:
sudo vim /etc/docker/daemon.json
Add:
{
  "dns": ["127.0.0.1"]
}
Restart Docker:
sudo systemctl restart docker
Network Configuration
Configure your DHCP server to provide your Pi-hole server's IP address as the DNS server for all clients.
Auto-start on Boot
Create a systemd service to auto-start the containers on boot:
sudo vim /etc/systemd/system/pihole-docker.service
Add:
[Unit]
Description=Pi-hole Docker Compose
Requires=docker.service
After=docker.service

[Service]
Type=oneshot
RemainAfterExit=yes
WorkingDirectory=/home/piholeuser/pihole
ExecStart=/usr/bin/docker-compose up -d
ExecStop=/usr/bin/docker-compose down

[Install]
WantedBy=multi-user.target
Enable the service:
sudo systemctl enable pihole-docker.service
Testing
Verify DNS Resolution
# Check if Pi-hole is using Unbound
docker exec -it pihole nslookup example.com unbound

# Test from another device
nslookup example.com your-pihole-ip
Block Lists
Now that you've got the stock standard installation going, you want to add your choice of block lists. I use the following from HaGeZi's
https://raw.githubusercontent.com/hagezi/dns-blocklists/refs/heads/main/domains/pro.plus.txt
https://raw.githubusercontent.com/StevenBlack/hosts/master/hosts
You can use regex lists if you follow my howto here: COMING SOON
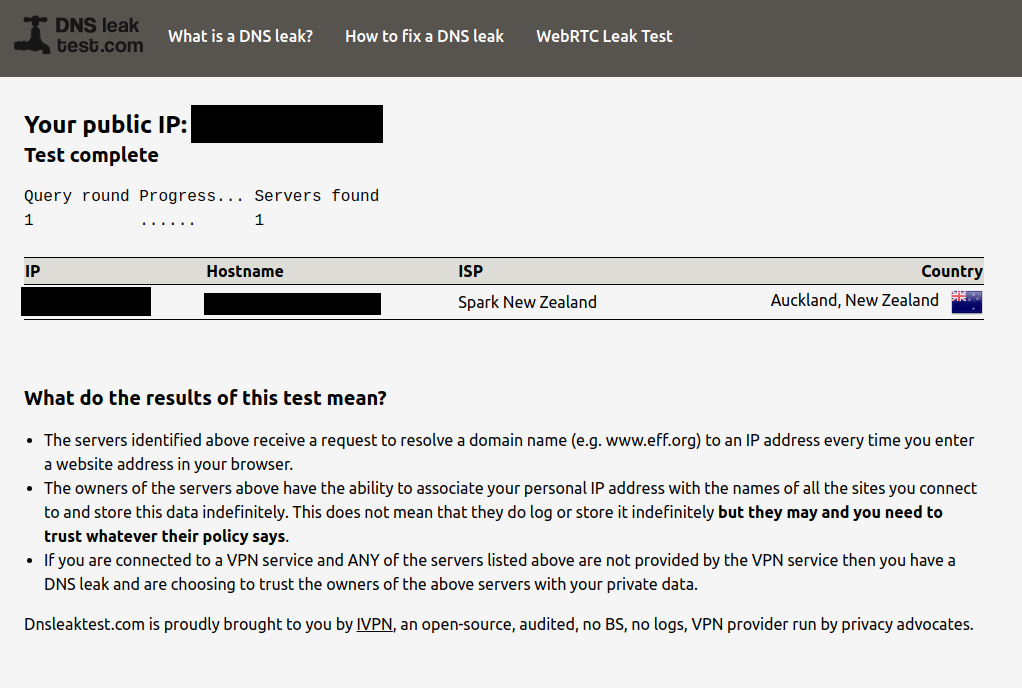
Check for DNS Leaks
Visit DNSLeakTest.com and run a standard test. If set up correctly, you should only see your ISP's servers, not Google or other public DNS providers.
Success!! ...
but only if you see 1x ISP there and it's yours.
Troubleshooting
Common Error: "ignoring query from non-local network"
This error occurs when Pi-hole refuses queries from networks it doesn't recognize as local.
This is one of the most common and frustrating issues when setting up Pi-hole in Docker. The default settings prevent Pi-hole from responding to queries from networks outside its Docker network.
Solution: In Pi-hole's web interface, go to Settings > DNS > Interface settings, and select "Permit all origins".
Unbound Not Working
If Unbound fails to start or respond to queries:
- Check Unbound logs:
docker logs unbound
- Verify Unbound is listening:
docker exec -it unbound netstat -tulpn | grep LISTEN
- Common Issue: Incorrect Mount Path
If Unbound isn't loading your custom configuration, verify your mount path matches the directory structure:
# Check if your config files are in the right place inside the container
docker exec -it unbound ls -la /etc/unbound/custom.conf.d/

# Should show your unbound.conf and root.hints files
The klutchell/unbound image expects custom configuration files to be in /etc/unbound/custom.conf.d/ directory. Make sure:
- Your local directory structure is
./unbound/ - Your docker-compose.yml mounts
./unbound:/etc/unbound/custom.conf.d - Configuration files are directly in the
unbounddirectory and named*.conf
- Ensure your
custom.conffile has the correct configuration.
Common Unbound Warnings (Normal Behavior)
These warnings are common and don't indicate problems:
Buffer Size Warning
warning: so-rcvbuf 1048576 was not granted. Got 425984. To fix: start with root permissions(linux) or sysctl bigger net.core.rmem_max(linux)
What it means: Unbound requested a 1MB receive buffer but only got ~400KB due to container limitations.
Impact: None - 400KB is sufficient for most home networks.
Fix (optional): Reduce the buffer size in your config:
so-rcvbuf: 400k # Instead of 1m
Duplicate Root Hints Warning
error: second hints for zone . ignored.
What it means: Unbound found multiple root hint configurations (built-in + your custom file).
Impact: None - Unbound uses the first valid hints and ignores duplicates.
Fix (optional): This is normal when using custom root hints files.
Subnetcache Module Warnings
warning: subnetcache: serve-expired is set but not working for data originating from the subnet module cache.
warning: subnetcache: prefetch is set but not working for data originating from the subnet module cache.
What it means: Some advanced caching features don't work with the subnet cache module.
Impact: None - basic caching and DNS resolution work perfectly.
Fix: These are informational and can be safely ignored.
Pi-hole Container Permission Issues
If you encounter permission errors when starting Pi-hole:
- Check ownership of your volume directories:
sudo chown -R 1001:1001 ~/pihole/pihole
sudo chown -R 1001:1001 ~/pihole/dnsmasq
sudo chown -R 1001:1001 ~/pihole/unbound
- Set appropriate permissions:
sudo chmod -R 755 ~/pihole/pihole
sudo chmod -R 755 ~/pihole/dnsmasq
sudo chmod -R 755 ~/pihole/unbound
- Specifically for Unbound config files:
sudo chmod 644 ~/pihole/unbound/*.conf
Pihole Gravity Lists Errors
If you get something like this when you try to run pihole -g or the Update Gravity links in the web-ui
[i] Target: https://raw.githubusercontent.com/hagezi/dns-blocklists/refs/heads/main/wildcard/nsfw.txt
  [✓] Status: No changes detected
  [✓] Parsed 0 exact domains and 0 ABP-style domains (blocking, ignored 75907 non-domain entries)
      Sample of non-domain entries:
        - *.0-porno.com
        - *.0000sex.com
        - *.000freeproxy.com
        - *.000pussy69pornxxxporno.com
        - *.000webhostapp.co
it's because you're using a list that PiHole can't process, either becuase its for a DNSMASQ client or otherwise.
One of the big things getting this working, was things like docker-compose.yml bind mounts not doing what I expected, possibly being mapped to the wrong places and the container not finding it, using defaults and me being oblivious to it and assuming the config took.
Big lesson, same lessons - config, apply, verify. Lots of reading the docker logs unbound and docker logs pihole to ensure it was going what I expected, before moving on or making changes.
Also, in the age of AI (this was an assisted task) critique and verify your ai assistants suggestions and configs.
This post was a Claude.AI collaboration, where I worked in a chat with Claude, designing and implementing this setup, often disagreeing and calling off various rabbitholes being ventured. What's nice is, I just ask Claude to summarise and document the work we did, and I review it and post it here.
Additional Notes
- Regularly update your blocklists in Pi-hole using the Gravity update feature
- Monitor DNS traffic using Pi-hole's built-in graphs and reports
- Consider adding additional block lists for enhanced protection