Proxmox: Systems Administration Notes
Hard Disk Resize
I ran out of diskspace on my AI machine, a VM on proxmox, needed to increase disksize.
You do NOT need to umount / partition to complete this resize, it is the LOGICAL VOLUME (lv) so can be done ONLINE
TL;DR
The partition I'm trying to resize is /dev/sda3, that has a logical volume on it /dev/ubuntu-vg/ubuntu-lv that's mapped to /
- resize vm disk in proxmox UI
- resize phyical volume:
pvresize /dev/sda3 - extend the size (
-L) of logical volume by 200G:lvextend -L 200G /dev/ubuntu-vg/ubuntu-lv - allocate extents from VG's available physical extents:
lvresize --extents +100%FREE --resizefs /dev/ubuntu-vg/ubuntu-lv - check disk, you should have your 200GiB added to your
/now (no reboot required).
everything from this point on is just my notes and outputs for posterity
Specs
info and details on what I'm working with:
Note - my VM disks are on Synology NFS.
Resize Virtual Disk
Use proxmox UI to select your VM, Hard Disk, Disk Action and Resize
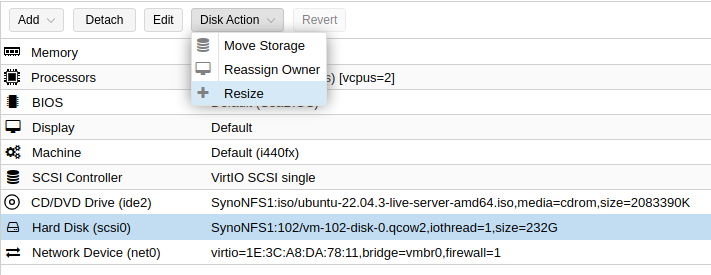
I added 200GB.
FDISK
My fdisk -l currently looks like this:
Device       Start      End  Sectors Size Type
/dev/sda1     2048     4095     2048   1M BIOS boot
/dev/sda2     4096  4198399  4194304   2G Linux filesystem
/dev/sda3  4198400 67106815 62908416  30G Linux filesystem
Parted
I don't have EFI on my partitions, so straight parted for me:
root@ai:~# parted /dev/sda
GNU Parted 3.4
Using /dev/sda
Welcome to GNU Parted! Type 'help' to view a list of commands.
(parted) print
Warning: Not all of the space available to /dev/sda appears to be used, you can fix the GPT to use all of the space (an extra 419430400 blocks) or continue with the current setting?
Fix/Ignore? F
Model: QEMU QEMU HARDDISK (scsi)
Disk /dev/sda: 249GB
Sector size (logical/physical): 512B/512B
Partition Table: gpt
Disk Flags:

Number  Start   End     Size    File system  Name  Flags
 1      1049kB  2097kB  1049kB                     bios_grub
 2      2097kB  2150MB  2147MB  ext4
 3      2150MB  34.4GB  32.2GB

(parted) resizepart 3 100%
(parted) quit
Information: You may need to update /etc/fstab.
Check Disk Size
original disk size was 15GB, mounted on /
root@ai:~# df -h
Filesystem                         Size  Used Avail Use% Mounted on
tmpfs                              392M  1.3M  390M   1% /run
/dev/mapper/ubuntu--vg-ubuntu--lv   15G   14G  540M  97% /
Disk is stil 15GB, need to resize LV
LV Resize
Check my logical volumes:
root@ai:~# lvdisplay
  --- Logical volume ---
  LV Path                /dev/ubuntu-vg/ubuntu-lv
  LV Name                ubuntu-lv
  VG Name                ubuntu-vg
  LV UUID                0dVeYn-iAMf-2qiD-9aCr-6EuB-rkCO-M9oZv7
  LV Write Access        read/write
  LV Creation host, time ubuntu-server, 2023-11-11 06:17:35 +0000
  LV Status              available
  # open                 1
  LV Size                <15.00 GiB
  Current LE             3839
  Segments               1
  Allocation             inherit
  Read ahead sectors     auto
  - currently set to     256
  Block device           253:0
The command to resize to fill all free space is: lvresize --extents +100%FREE --resizefs /dev/{volume group name}/{lv name}
root@ai:~# lvresize --extents +100%FREE --resizefs /dev/ubuntu-vg/ubuntu-lv
  Size of logical volume ubuntu-vg/ubuntu-lv changed from <15.00 GiB (3839 extents) to <30.00 GiB (7679 extents).
  Logical volume ubuntu-vg/ubuntu-lv successfully resized.
resize2fs 1.46.5 (30-Dec-2021)
Filesystem at /dev/mapper/ubuntu--vg-ubuntu--lv is mounted on /; on-line resizing required
old_desc_blocks = 2, new_desc_blocks = 4
The filesystem on /dev/mapper/ubuntu--vg-ubuntu--lv is now 7863296 (4k) blocks long.
this command seemed to have resized ubuntu-lv from 15GiB to 30GiB.
check volume group display
root@ai:~# vgdisplay
  --- Volume group ---
  VG Name               ubuntu-vg
  System ID
  Format                lvm2
  Metadata Areas        1
  Metadata Sequence No  3
  VG Access             read/write
  VG Status             resizable
  MAX LV                0
  Cur LV                1
  Open LV               1
  Max PV                0
  Cur PV                1
  Act PV                1
  VG Size               <30.00 GiB
  PE Size               4.00 MiB
  Total PE              7679
  Alloc PE / Size       7679 / <30.00 GiB
  Free  PE / Size       0 / 0
  VG UUID               Uzrj6y-rERw-DxUt-asxv-ZjfD-wRck-b23lsx
Still showing Volume Group size as <30.00 GiB...
pvscan is showing:
root@ai:~# pvscan
  PV /dev/sda3   VG ubuntu-vg       lvm2 [<30.00 GiB / 0    free]
  Total: 1 [<30.00 GiB] / in use: 1 [<30.00 GiB] / in no VG: 0 [0   ]
Check lsblk to see where our block devices are:
root@ai:~# lsblk
NAME                      MAJ:MIN RM   SIZE RO TYPE MOUNTPOINTS
loop0                       7:0    0  63.5M  1 loop /snap/core20/2015
loop1                       7:1    0  63.4M  1 loop /snap/core20/1974
loop2                       7:2    0  49.6M  1 loop /snap/aws-cli/360
loop3                       7:3    0  49.5M  1 loop /snap/aws-cli/356
loop4                       7:4    0 128.9M  1 loop /snap/docker/2904
loop5                       7:5    0  73.9M  1 loop /snap/core22/864
loop6                       7:6    0 169.3M  1 loop /snap/microk8s/6103
loop7                       7:7    0 111.9M  1 loop /snap/lxd/24322
loop8                       7:8    0  95.7M  1 loop /snap/kata-containers/2446
loop9                       7:9    0    71M  1 loop /snap/prometheus/86
loop10                      7:10   0  53.3M  1 loop /snap/snapd/19457
loop11                      7:11   0  40.9M  1 loop /snap/snapd/20290
sda                         8:0    0   232G  0 disk
├─sda1                      8:1    0     1M  0 part
├─sda2                      8:2    0     2G  0 part /boot
└─sda3                      8:3    0   230G  0 part
  └─ubuntu--vg-ubuntu--lv 253:0    0    30G  0 lvm  /
So we can see the sda disk does have the extra 200 GiB allocated to it, but the LV ubuntu--vg-ubuntu--lv under partition sda3 is still on ly 30GiB.
I try lvextend to add 200GiB to that logical volume, but get an error:
root@ai:~# lvextend -L 200G /dev/ubuntu-vg/ubuntu-lv
  Insufficient free space: 43521 extents needed, but only 0 available
It's not until I do a pvresize on the physical disk I resized to 200GiB that I can see the disk space available to the volume group.
root@ai:~# pvresize /dev/sda3
  Physical volume "/dev/sda3" changed
  1 physical volume(s) resized or updated / 0 physical volume(s) not resized
Check vg again
root@ai:~# vgdisplay
  --- Volume group ---
  VG Name               ubuntu-vg
  System ID
  Format                lvm2
  Metadata Areas        1
  Metadata Sequence No  4
  VG Access             read/write
  VG Status             resizable
  MAX LV                0
  Cur LV                1
  Open LV               1
  Max PV                0
  Cur PV                1
  Act PV                1
  VG Size               <230.00 GiB
  PE Size               4.00 MiB
  Total PE              58879
  Alloc PE / Size       7679 / <30.00 GiB
  Free  PE / Size       51200 / 200.00 GiB
  VG UUID               Uzrj6y-rERw-DxUt-asxv-ZjfD-wRck-b23lsx
pvscan is now:
root@ai:~# pvscan
  PV /dev/sda3   VG ubuntu-vg       lvm2 [<230.00 GiB / 200.00 GiB free]
  Total: 1 [<230.00 GiB] / in use: 1 [<230.00 GiB] / in no VG: 0 [0   ]
I retry extending the ubuntu-lv by 200GiB
root@ai:~# lvextend -L 200G /dev/ubuntu-vg/ubuntu-lv
  Size of logical volume ubuntu-vg/ubuntu-lv changed from <30.00 GiB (7679 extents) to 200.00 GiB (51200 extents).
  Logical volume ubuntu-vg/ubuntu-lv successfully resized.
Success. Check filesystem size where my lv is mounted to /
root@ai:~# df -h /
Filesystem                         Size  Used Avail Use% Mounted on
/dev/mapper/ubuntu--vg-ubuntu--lv   30G   14G   15G  48% /
still at 30G, now I do the lvresize to fill up ubuntu-lv with all available disk that's free:
oot@ai:~# lvresize --extents +100%FREE --resizefs /dev/ubuntu-vg/ubuntu-lv
  Size of logical volume ubuntu-vg/ubuntu-lv changed from 200.00 GiB (51200 extents) to <230.00 GiB (58879 extents).
  Logical volume ubuntu-vg/ubuntu-lv successfully resized.
resize2fs 1.46.5 (30-Dec-2021)
Filesystem at /dev/mapper/ubuntu--vg-ubuntu--lv is mounted on /; on-line resizing required
old_desc_blocks = 4, new_desc_blocks = 29
The filesystem on /dev/mapper/ubuntu--vg-ubuntu--lv is now 60292096 (4k) blocks long.
check block devices now:
root@ai:~# lsblk
NAME                      MAJ:MIN RM   SIZE RO TYPE MOUNTPOINTS
loop0                       7:0    0  63.5M  1 loop /snap/core20/2015
loop1                       7:1    0  63.4M  1 loop /snap/core20/1974
loop2                       7:2    0  49.6M  1 loop /snap/aws-cli/360
loop3                       7:3    0  49.5M  1 loop /snap/aws-cli/356
loop4                       7:4    0 128.9M  1 loop /snap/docker/2904
loop5                       7:5    0  73.9M  1 loop /snap/core22/864
loop6                       7:6    0 169.3M  1 loop /snap/microk8s/6103
loop7                       7:7    0 111.9M  1 loop /snap/lxd/24322
loop8                       7:8    0  95.7M  1 loop /snap/kata-containers/2446
loop9                       7:9    0    71M  1 loop /snap/prometheus/86
loop10                      7:10   0  53.3M  1 loop /snap/snapd/19457
loop11                      7:11   0  40.9M  1 loop /snap/snapd/20290
sda                         8:0    0   232G  0 disk
├─sda1                      8:1    0     1M  0 part
├─sda2                      8:2    0     2G  0 part /boot
└─sda3                      8:3    0   230G  0 part
  └─ubuntu--vg-ubuntu--lv 253:0    0   230G  0 lvm  /
check filesystem size again:
root@ai:~# df -h /
Filesystem                         Size  Used Avail Use% Mounted on
/dev/mapper/ubuntu--vg-ubuntu--lv  227G   14G  204G   7% /
success.
Appendix
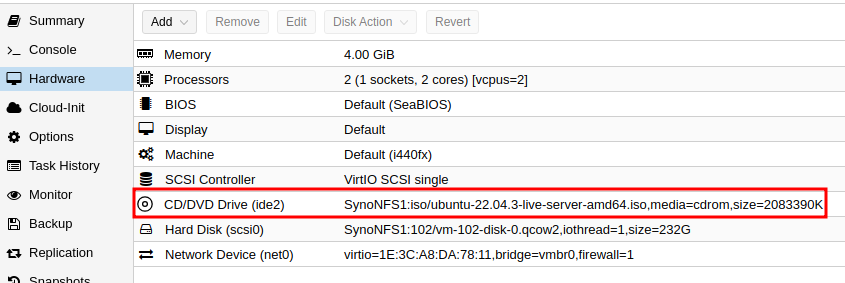
Shell on a LiveCD
Under 'Hardware', set your CD/DVD to a LiveCD ISO
Boot Order
Go to 'Options', select 'Boot Order' and then 'Edit'
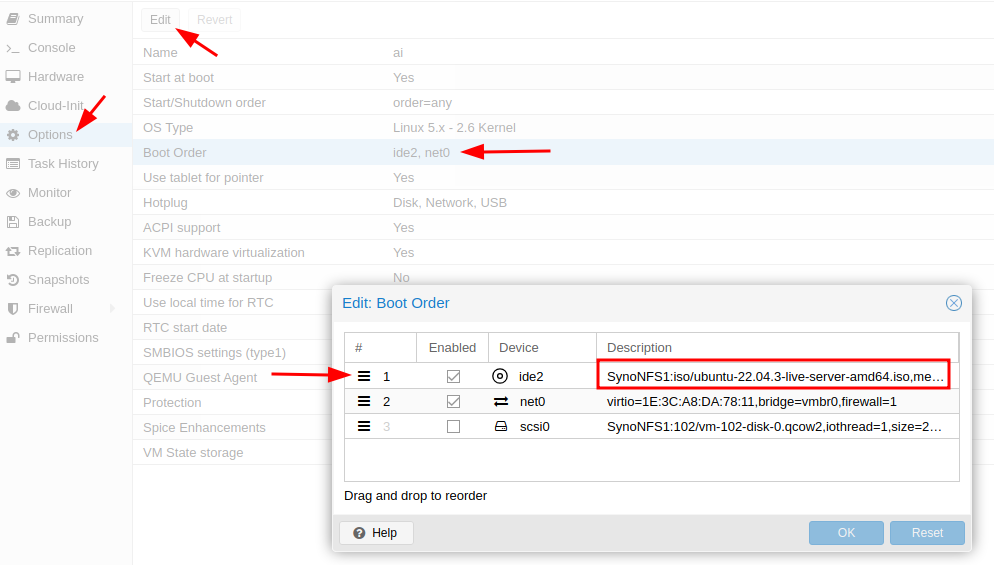
Move your LiveCD ISO entry up so it's in first position to get booted first.
Boot into your LiveCD
Shell
The new Ubuntu liveCDs don't boot you into a window environment anymore, so during the installation process, go to 'Help' in the top-right corner and find Enter shell
